There are loads of situations where you need a quick way to spin up an HTTP server. The following are just off the top of my head but I bet you can all think of more:
- You have established a shell and you want to upload tools to your new computer.
- You want to exfil data back out of an environment.
- You have found an XSS and you want to prove you can get useful data out of a victim’s session easily.
- You want to host a JavaScript file to prove the dangers of poor Transport Layer Security or sites which host files on 3rd party hosts.
In these situations configuring Apache is overkill and you probably only want a simple service which will last a matter of minutes. I am going full Python for this one and I have reworked this post to include Python3 syntax to keep it current in 2018.
Don’t Run with Scissors
The HTTP and HTTPS listeners that I show in this post will share the contents of the folder where you run them. As with all situations “BE AWARE OF WHAT IS IN YOUR WEB ROOT“. If you are starting a listener on the Internet then it will be port scanned within 30 minutes, and you will see automated attackers spamming your logs.
Before you run any of these services take a moment to consider where you are running them. I usually create a folder in “/tmp/” for an engagement such as “/tmp/safeplace” since this will not persist for very long.
Additionally, these servers have Directory Listings enabled by default. If you want to limit what can be seen it is a good idea to create an “index.html” file in your folder. That way your assailant will be forced to use Dirbuster which gets noisy.
Simple HTTP Server (Python 2)
For most situations this is my goto move:
python -m SimpleHTTPServer <port> # Syntax
python -m SimpleHTTPServer 8080   # Example
When you run this it starts to log things to the console as shown:

By default you get the IP address of the client. Then the files and response codes.
Simple HTTP Server (Python 3)
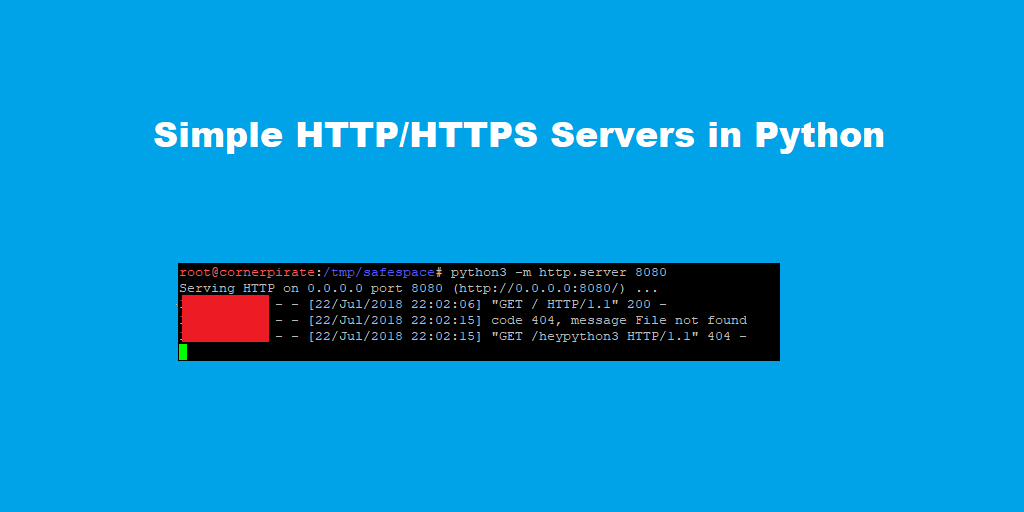
Python 3 is the future!!! They have renamed the module to “http.server”. Time to update your tools to do this:
python3 -m http.server <port> # Syntax
python3 -m http.server 8080   # Example
Which does very similar things as shown below:

Not a lot different really.
Generating Keys and Certificates for HTTPS
Sometimes you need to use HTTPS. The two best cases are:
- To Gain Privacy – if your target has traffic inspection but they do not terminate SSL then you can genuinely smuggle shells through SSL. I have seen a customer network which would catch plain-text but did nothing about an HTTPS connection.
- To Avoid Browser Mixed Content Warnings – these warnings can hinder a decent proof of concept. If you are trying something that “should be working goddamn it!”. Consider looking at the developer tools for your web browser and look for mixed content exceptions.
Whatever your motivation the HTTPS services I show will rely on you having a “privatekey.pem” and “cert.pem” file. You can generate these with openssl using the commands below:
openssl genrsa > privatekey.pem
openssl req -new -x509 -key privatekey.pem -out cert.pem -days 365
You will be prompted to enter information to populate the fields of your self-signed SSL certificate. I stuff those with spam for proof of concepts. If I was engaged in a phishing exercise then a legit SSL certificate is the right move.
Simple HTTPS Server (Python 2)
I really liked “twisted” because it can do a *lot* of things. First you will need to install that using python’s pip package manager as shown:
pip install twisted
You can then start an HTTPS service using the command below:
twistd web --https=<port> --path=. -c </path/to/cert.pem> -k </path/to/privatekey.pem> #Syntax
twistd web --https=8443 --path=. -c cert.pem -k privatekey.pem                         #Example
Twisted automatically creates a logfile called “twisted.log” in the current directory it does not want to echo to stdout so you need to use:
tail -f twisted.log
The “-f” means read this file when it changes. The following shows what this means:

The content of the output includes User-Agents and more debugging related to SSL but is otherwise similar to “SimpleHTTPServer”.
Simple HTTPS Server (Python 3)
Python 3 is the future!!! Python 3 is the future!!! Python 3 is the future!!!
Again there are minor differences between python 2 and 3. This time you have to use “pip3” to install Twisted:
pip3 install twisted
If you already have “twisted” installed for python 2 this can get a bit confusing. Running the above seems to clobber the version in the path. When you run “which twistd” you will be pointed at the python3 version. Don’t trust me? Check the first line of that file:

Great. So is the syntax to run the server different? Fortunately not in my test the following worked just fine once more:
twistd web --https=<port> --path=. -c </path/to/cert.pem> -k </path/to/privatekey.pem> #Syntax
twistd web --https=8443 --path=. -c cert.pem -k privatekey.pem                         #Example
Hope that saves you some time when you want a simple HTTPS server!
Take care

following your guid get this error:
/usr/local/bin/twistd web: SSL support not installed
Did you solve the error? It is possible that the dependency situation out the box has changed since I wrote the guide. From google results it looks like it might be:
pip install pyOpenSSL
But not sure. If you did find an answer then commenting back would let me amend the article
this guy rules