
Report Compiler is a Java GUI allowing you to manipulate the output of various computer security scanner tools and save the results as XML. That is great if all you want to do is make an ordered list of vulnerabilities and set their ratings etc.
What it does not do is take that final step for you and make the a word document from the resulting tree. It does this on purpose since that becomes a commercial advantage that I should not give anyone, and also because you need to take ownership of your own companies reporting template not me! If I gave you a way to make word docs it would simply become a bun fight as to what to include and where.
This post will cover techniques you can use to integrate with your own word template by presenting a complete end-to-end process.
So you WANT to import an XML file into a word document and have it do pretty things? You have three options:
| Option | Pros | Cons |
| Create a Word application level add-in | 1. Always available when word is open. 2. Maximum level of control. 3. Allows you to use “modern” approach via Visual Studio. 4. Shipped docx files do not have any macros (no security warnings to recipients). |
1. Visual Studio costs money to get the project template. |
| Create a Word template with embedded macros | 1. You can use the VB editor built into word (ALT+F11). 2. Decent level of control over word objects. |
1. Debugging a macro is a PAIN in the arse. 2. Can trigger security alerts when emailing resulting files. 3. The VBA coding interface is not modern compared to Visual Studio. |
| Create a script to convert XML to docx | 1. Doing it all in code means learning nothing about word! 2. It is usually quicker to make a PoC. |
1. I have used various libraries to do this in various languages. You do not have full control of Word objects with any of them. 2. The learning curve is steep as the APIs are usually not well explained. For simple tasks this is usually sufficient though. |
The keen ones amongst you will note that option 2 (embedded macro) is the only one that everyone has access to. So this post will focus on that.
This post will describe the techniques that can be used to integrate ReportCompiler’s XML with a word document. It covers the following:
- Creating a report template – So we are on the same page lets make a blank document and show all I am doing step by step.
- Creating a building block for your vulnerability – design a reusable section you want to rely on again and again to deliver the start point for your vulnerability write ups.
- Add bookmarks – these are place holders that should be inserted for instance where the title of the vulnerability should be placed within your blank vulnerability.
- Save that as a building block
- How to manually re-use that building block again.
- Modify Word GUI to add options – A tangent away from importing ReportCompiler but very useful.
- Add a macro to import ReportCompiler XML file – After all of the above finally getting down to showing the Macro code capable of importing XML and dropping it within your blank vulnerability.
By the end of this you will be capable of leveraging ReportCompiler to aid your reporting in your day job. There should be no mysteries left and you can use it to bodge pretty much any reporting process which ultimately lands as a word document before delivery.
The final template that was produced by this tutorial is available on github at:
https://github.com/cornerpirate/ReportCompilerWordMacroDemo
If you are familiar with all of the word concepts and just want to see the thing in operation then skip to the end my friend.
Create a report template
A template is NOT a docx it is a dotx or in this case a dotm file since we are going to save a macro in it. If you are using a docx then you are not getting the full benefits of templating using word.
When you double click on a template file (dotx or dotm) it will launch a new instance of the file called “Document 1” which is entirely separate. This means edits in your new report are not directly editing your source template. Ensure your template has no client data in it and profit from never worrying about cross contamination from old reports again!
Create a building block for your vulnerability
I covered the concept of building blocks in Word Tips. The high level idea is that if you want to re-use a section you should probably create a building block. In this case our Macro is going to want a predefined building block to drop and then populate with our data from ReportCompiler.
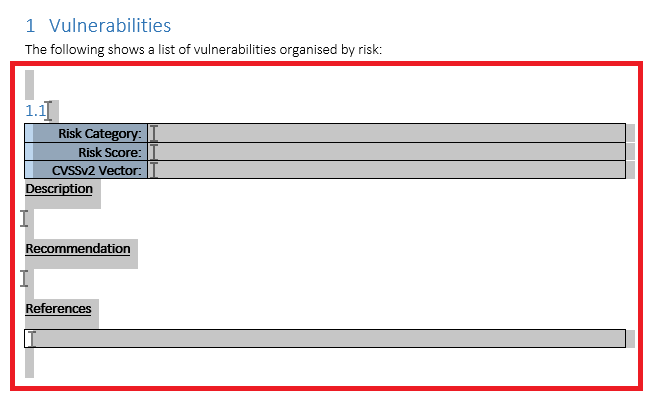
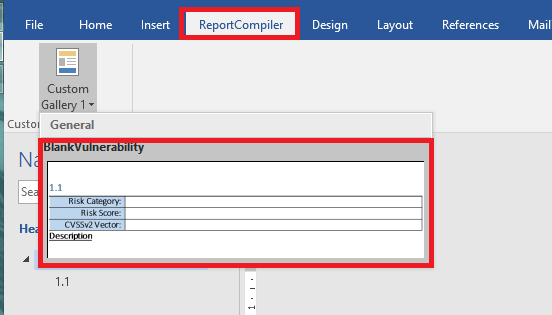
The following shows part of the template where I created a basic structure that all our vulnerabilities can go into:
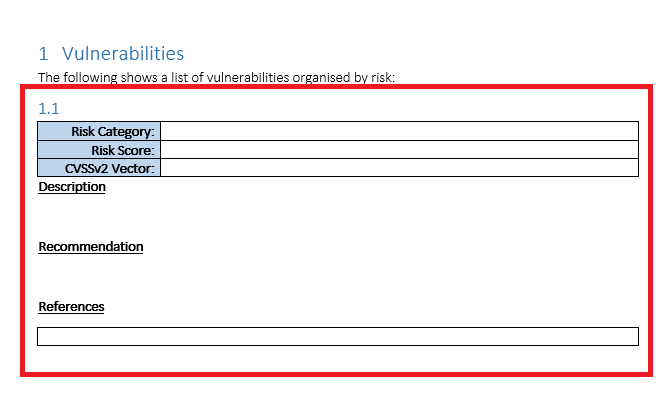
The part highlighted in red demonstrates the area which will become our building block. The line starting 1.1 is a Heading 2 style paragraph which will be where the vulnerability title will appear. This is a good choice since your vulnerabilities will appear in the table of contents and you can cross-reference to this specific heading.
Add bookmarks
The previous screenshot shows the building block without any “bookmarks” set. Here I will show how to add one and then show the final product.
To insert a bookmark follow the steps below:
- Place the mouse cursor at the desired location.
- In this case click after 1.1 where the vulnerability title should go.
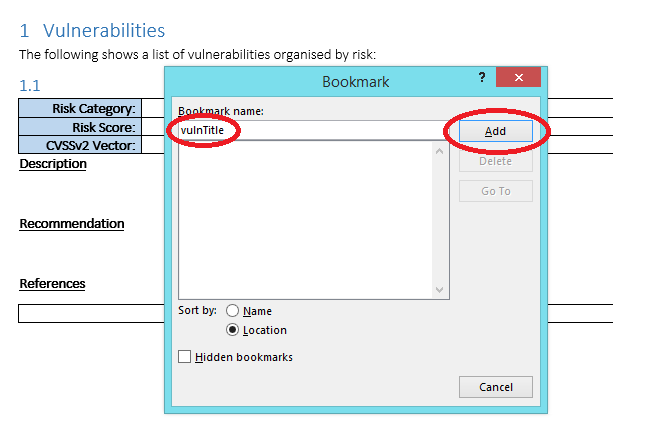
- Click on the “insert” tab on the ribbon and then look for the “links” section to find the “Bookmark” option.
- This will load a popup. Give the bookmark a useful name and then click on “add” as shown below:
After you have clicked on “add” you should see a new bookmark next to the 1.1 as shown below:
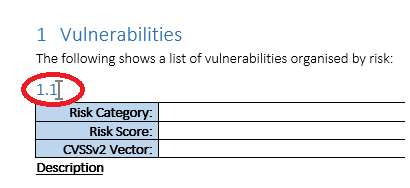
If you do not see that vertical grey bar then the bookmark has either not been added or your view in word is setup to hide formatting.
If you click “insert” -> “Bookmark” your bookmark should be visible in the list also.
Now that you know how to add one bookmark here I go skipping to the end to show where the additional ones go into our building block:
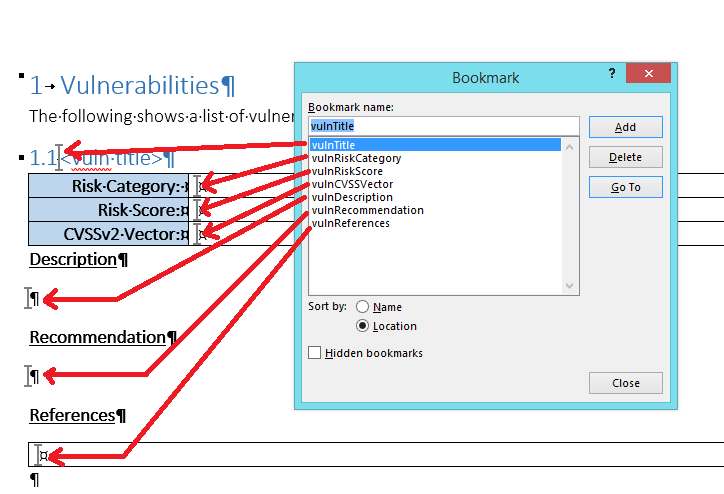
You probably want to take note of the exact bookmark names as case is important when it comes to the Macro interacting with these.
Note; I took the screenshot at a point where the vuln title was not blank. I could not be bothered redoing the red lines. Sue me.
It is also possible to use placeholder text and then simply search and replace that to obtain the same results. However, when it comes to performance that worked out way slower and way more prone to errors. Hence I now use Bookmarks like I was probably always supposed to.
Save as building block
Now that we have a blank vulnerability section marked up with Bookmarks we should go ahead and save that as a building block. To do that select all of the content that you want to save as shown:
At this point you want to follow the steps below:
- Click on the “insert” tab on the ribbon.
- Click on the area labelled “Quick Parts” on the text group (towards the right of the screen).
- Click on “Save selection to quick part gallery”
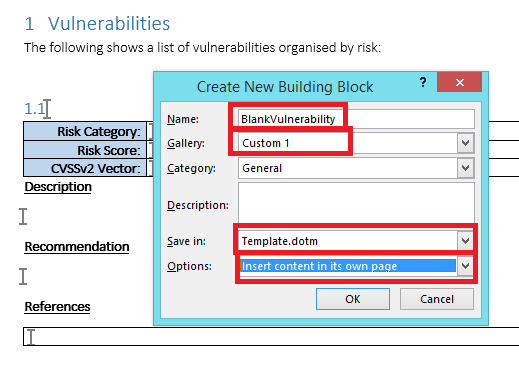
- Then configure the building block as shown below:
A couple of things are worth highlighting here:
- Name – Select a useful name and note it down. Your macro will need to know the exact case sensitive version of this.
- Gallery – Select a custom gallery, others are available but if you use Custom 1 then you can add a control easily to word to show ONLY building blocks in that gallery. This is shown later under heading “Modify Word GUI to add options” below if you cannot wait.
- Save In – If you want the building blocks to be shipped with your template then the name of your dotm should appear here. If you were to change the drop down to “normal.dotm” or the other options, then you will find that building blocks are stuck on your “developer” computer. By selecting the template file itself you are ensuring they are shipped to other users which is almost always what you will want.
- Options – I have selected “Insert Content on its own page”. You can alter that if you want vulnerabilities to appear one immediately after the other. Sometimes people want one vulnerability per page etc. Choice is yours.
Click on “ok” and you will find that the building block has been saved to Custom Gallery 1.
Now that you have saved this as a building block you can go ahead and straight up delete the highlighted blank vulnerability. Your report template probably wants to start with zero vulnerabilities since you haven’t found any yet.
Save the template file at this point.
How to insert our blank vulnerability when making a report?
This section is optional if you know how to use building blocks. Skip straight down to the macro if you already know this.
In the previous section we finally saved our blank vulnerability as a building block. We can use the laborious “insert” -> “quick parts” -> “building blocks organiser” -> find Custom 1 gallery entry, select the block we want and then “insert” process to manually add back in our building block. But that is a lot of effort to do every time.
Word has a few options to make inserting your blank vulnerability easier. One is simply start typing the name of the building block. In this case we called it “BlankVulnerability”.
The following shows what happens if you try and type “blank”:
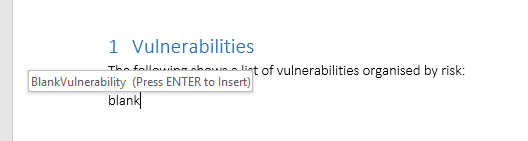
You can press Enter to insert the building block. Amazeballs yea?
However, what if you grow your building blocks repository massively are you going to remember all of the names? In which case look in the next section to GUI yourself happy.
Modify Word GUI to add options
This section is optional if you know how to use building blocks. Skip straight down to the macro if you already know this.
It is possible to modify the Word GUI to add a custom tab to allow us to put pretty much any control we want where we want it. The process is a bit convoluted so most people get scared and never bother.
Follow the steps listed below to do this:
- Access the word options by going to “File” -> and then “Options”.
- Click on “Customize Ribbon” on the left hand side.
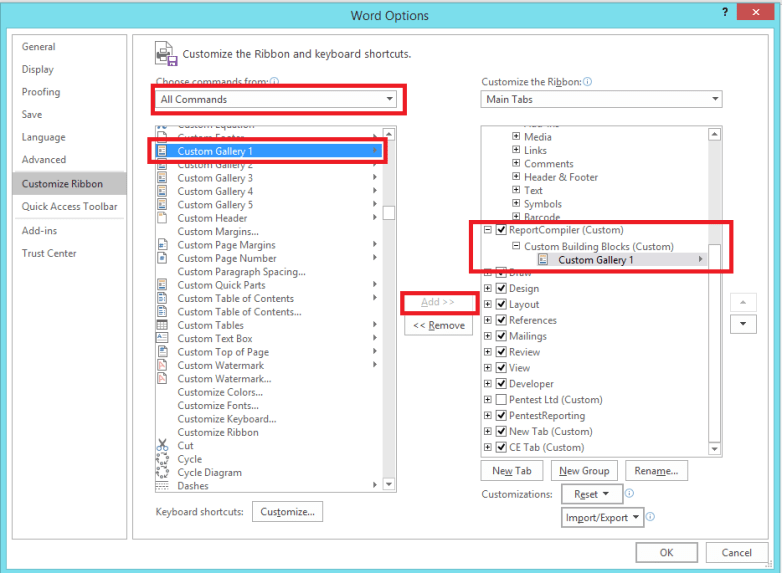
- Where it says “Choose commands from” select the drop down and set it to “All Commands”
- In the massive list of all commands find the “Custom Gallery 1” control (this has to match exactly the Gallery you saved your building block into.
- On the right hand side you need to create a new tab. Click on “New Tab”, you can right click on the newly created tab and give is a name. I called mine “ReportCompiler”.
- You should then select the “ReportCompiler” tab and then click on “New Group”. Again right click on the newly made group and rename this to something meaningful. I used “Custom Building Blocks” as the name.
- On the right hand side you should have your custom group selected and on the left hand side “Custom Gallery 1” should be selected. Now click on “Add >>” in the middle and watch in awe as it adds that to your custom group.
The following screenshot shows how this should look at the end of the process:
If all is well you should have a brand new tab on your ribbon called “ReportCompiler”. Why on earth did I bother making you do that? Well looky at your new tab here:
It shows you a preview of the building block, it shows the name of the building block, it only shows your building blocks, and if you click on one it will drop it instantly into the word document.
This saves me a lot of time. However, this has nothing to do with the Macro importing of ReportCompiler which we are getting onto in the next section.
Add a macro to import ReportCompiler XML file
Now you have; a blank vulnerability section marked up with bookmarks, saved in Custom Gallery 1. You are good to go and fire into the world of VBA within word.
I have to admit that the development environment for VBA is pretty poor and you will have a real nightmare debugging things at first. It really feels legacy but we are just about able to coax what we want out of it. If you want all of the modern conveniences your best best is to write an application level word add-in which requires a paid for version of Visual Studio to get the project template.
You should have a word document roughly similar to mine at this point. Press “ALT”+F11 to launch the VBA Editor.
My file is called “Template.dotm” we want to make sure our VBA code is in the right project. The following screenshot shows how to locate the correct one:
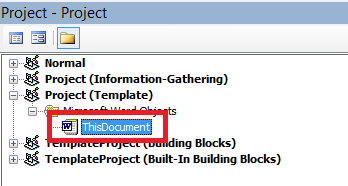
Find the project called “Project (<filename>)” then expand and select “ThisDocument”.
This means that we are finally embedding a Macro into this template file.
When the user double clicks on “Template.dotm” they will get a new file called “Document 1.docm” which will also contain any VBA specified in “ThisDocument”. Got it? Good.
The following shows the full listing for the Macro code that I am giving you to get started with. If you copy it all and paste it into that massive empty text box on the right you will have just created the same template.dotm that I have added to github:
”’
‘Copyright 2016 Cornerpirate
‘
‘Licensed under the Apache License, Version 2.0 (the “License”);
‘you may not use this file except in compliance with the License.
‘You may obtain a copy of the License at
‘
‘ http://www.apache.org/licenses/LICENSE-2.0
‘
‘Unless required by applicable law or agreed to in writing, software
‘distributed under the License is distributed on an “AS IS” BASIS,
‘WITHOUT WARRANTIES OR CONDITIONS OF ANY KIND, either express or implied.
‘See the License for the specific language governing permissions and
‘limitations under the License.
”’”’
‘ 1) Prompt user for location of report compiler file.
‘ 2) Parse file and get access to all “vuln” tags.
‘ 3) Loop through each vuln and add into word document at current selection location.
‘ There is no error handling, and this is NOT handling how you get the affected hosts,
‘ Or handling the reference URLs. If it a demo of how to read the XML file and shows
‘ how to access XML attributes, and decode the base64 text fields. You can take it
‘ from here right?
Sub ImportVulns()Debug.Print “== ImportVulns”
‘ 1) Prompt user for file
filepath = promptForInputFile()
Debug.Print “User Selected:” + filepath‘ 2) Parse XML
Dim objXML As MSXML2.DOMDocument60
Set objXML = New MSXML2.DOMDocument60
If Not objXML.Load(filepath) Then
Err.Raise objXML.parseError.ErrorCode, , objXML.parseError.reason
End IfDim xmlNodes As MSXML2.IXMLDOMNodeList
Dim xmlNode As MSXML2.IXMLDOMNode‘
Set xmlNodes = objXML.getElementsByTagName(“vuln”)‘ Before inserting anything park the undo record tracker
‘ This should mean one undo will remove all vulns added.
Dim objUndo As UndoRecord
Set objUndo = Application.UndoRecord
objUndo.StartCustomRecord (“Insert Vuln Action”)‘ Loop through each vuln tag.
For Each xmlNode In xmlNodesDim title, description, riskcategory, riskscore, cvssvector, recommendation As String
Dim customRisk As Boolean‘ get properties from attributes
riskcategory = xmlNode.Attributes.getNamedItem(“category”).text
customRisk = StrComp(xmlNode.Attributes.getNamedItem(“custom-risk”).text, “true”)
‘ A “custom Risk” is something using “high”, “medium”, or “low” style risk scoring.
‘ A “CVSS” vuln is one using CVSS.
If (customRisk) Then
cvssvector = xmlNode.Attributes.getNamedItem(“cvss”).text
‘ Here I am substringing to get only the base vector.
‘ This is a demo only, and you might want the full vector.
cvssvector = Mid(cvssvector, 7, 26)
Else
‘ This is a custom risk, we do not have a CVSS vector
cvssvector = “n/a”
End Ifriskscore = xmlNode.Attributes.getNamedItem(“risk-score”).text
‘ get simple data from child nodes.
title = DecodeBase64(GetDataFromNodesChildren(xmlNode, “title”))
description = DecodeBase64(GetDataFromNodesChildren(xmlNode, “description”))
description = Replace(description, vbNewLine, “BB”)
recommendation = DecodeBase64(GetDataFromNodesChildren(xmlNode, “description”))Debug.Print title
‘ At this point we need to get the building block
‘ Called “BlankVulnerability” which will be in the templates building blocks.
Dim oTemplate As template
Dim oBuildingBlock As BuildingBlock
Dim theBuildingBlock As BuildingBlock
Dim i As IntegerSet oTemplate = activeDocument.AttachedTemplate
For i = 1 To oTemplate.BuildingBlockEntries.count
Set oBuildingBlock = oTemplate.BuildingBlockEntries.Item(i)
If oBuildingBlock.name = “BlankVulnerability” Then
Set theBuildingBlock = oBuildingBlock
End If
Next‘ Add this vulnerability at the current selection range.
‘ This means “where the cursor is”
Set newRange = theBuildingBlock.Insert(Selection.range)
‘ After insertion update all of the details using the bookmarks for the locations
newRange.Bookmarks(“vulnTitle”).range.text = title
newRange.Bookmarks(“vulnDescription”).range.text = description
newRange.Bookmarks(“vulnRecommendation”).range.text = recommendation
newRange.Bookmarks(“vulnRiskCategory”).range.text = riskcategory
newRange.Bookmarks(“vulnRiskScore”).range.text = riskscore
newRange.Bookmarks(“vulnCVSSVector”).range.text = cvssvectorNext
‘End the custom undo record
objUndo.EndCustomRecordEnd Sub
”’
‘ Display popup looking for Report Compiler XML file
‘ Returns file path.
Function promptForInputFile() As String
Dim fd As Office.FileDialog
Set fd = Application.FileDialog(msoFileDialogFilePicker)
fd.AllowMultiSelect = False
fd.title = “Please select the file.”
fd.Filters.Clear
fd.Filters.Add “Extensible Markup Language Files”, “*.xml”
fd.ShowpromptForInputFile = fd.SelectedItems(1)
End Function
”’
‘ Drill through the child nodes and return text of the named node.
‘
Function GetDataFromNodesChildren(xmlNode As MSXML2.IXMLDOMNode, name As String) As StringDim answer As String
Dim childNodes As MSXML2.IXMLDOMNodeList
Set childNodes = xmlNode.childNodesDim childNode As MSXML2.IXMLDOMNode
For Each childNode In childNodes
If StrComp(childNode.nodeName, name) = 0 Then
‘ found the target node
answer = childNode.text
End If
NextGetDataFromNodesChildren = answer
End Function”’
‘ Taken from here:
‘ http://thydzik.com/vb6vba-functions-to-convert-binary-string-to-base64-string/
Function DecodeBase64(ByVal strData As String) As String
Dim objXML As MSXML2.DOMDocument60
Dim objNode As MSXML2.IXMLDOMElementSet objXML = New MSXML2.DOMDocument60
Set objNode = objXML.createElement(“b64”)
objNode.dataType = “bin.base64”
objNode.text = strData
DecodeBase64 = StrConv(objNode.nodeTypedValue, vbUnicode)Set objNode = Nothing
Set objXML = Nothing
End Function
This has comments to explain the big things and it will read better in the VBA editor than on this page for sure.
Use CTRL+S to save the macro into your document.
At this point you can run the “ImportVulns” function by placing your cursor inside it and pressing F5. Or you can get fancy and bind the macro to a button on our ReportCompiler tab (if you followed the previous section you should roughly know how already).
The following screenshot shows how that should appear once done:
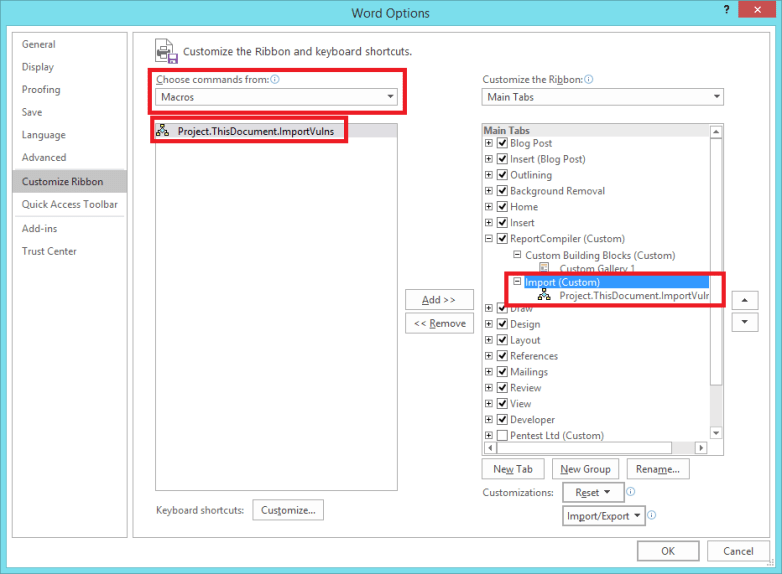
The difference this time is that you should select “Macros” for the “Choose Commands From” setting. I also created a new group and called it “import” and then placed the macro under that group.
If you have done the customisation correctly you should see the following options on your “ReportCompiler” tab:
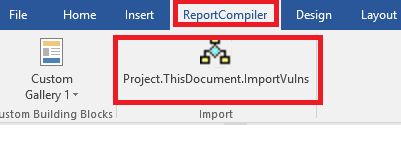
If you click on this button it will do as the VBA comments say:
1) Prompt user for location of report compiler file.
2) Parse file and get access to all “vuln” tags.
3) Loop through each vuln and add into word document at current selection location.
Error; User-defined type not defined
If you are running the “ImportVulns” function and it produces this error. The chances are that you need to map XML as a resource. To fix this follow these steps:
- select the relevant “ThisDocument” again from the projects on the top left side. (this was shown previously)
- Click on “tools” menu along the top and select “References”.
- Scroll down the list until you find “Microsoft XML, v6.0” and check that.
The following screenshot demonstrates the above process:

This should resolve the error.

1 Comment