There are loads of situations where you need a quick way to spin up an HTTP server. The following are just off the top of my head but I bet you can all think of more:
You have established a shell and you want to upload tools to your new computer.
You want to exfil data back out of an environment.
You have found an XSS and you want to prove you can get useful data out of a victim’s session easily.
You want to host a JavaScript file to prove the dangers of poor Transport Layer Security or sites which host files on 3rd party hosts.
In these situations configuring Apache is overkill and you probably only want a simple service which will last a matter of minutes. I am going full Python for this one and I have reworked this post to include Python3 syntax to keep it current in 2018.
Don’t Run with Scissors
The HTTP and HTTPS listeners that I show in this post will share the contents of the folder where you run them. As with all situations “BE AWARE OF WHAT IS IN YOUR WEB ROOT“. If you are starting a listener on the Internet then it will be port scanned within 30 minutes, and you will see automated attackers spamming your logs.
Before you run any of these services take a moment to consider where you are running them. I usually create a folder in “/tmp/” for an engagement such as “/tmp/safeplace” since this will not persist for very long.
Additionally, these servers have Directory Listings enabled by default. If you want to limit what can be seen it is a good idea to create an “index.html” file in your folder. That way your assailant will be forced to use Dirbuster which gets noisy.
Sometimes you need to use HTTPS. The two best cases are:
To Gain Privacy – if your target has traffic inspection but they do not terminate SSL then you can genuinely smuggle shells through SSL. I have seen a customer network which would catch plain-text but did nothing about an HTTPS connection.
To Avoid Browser Mixed Content Warnings – these warnings can hinder a decent proof of concept. If you are trying something that “should be working goddamn it!”. Consider looking at the developer tools for your web browser and look for mixed content exceptions.
Whatever your motivation the HTTPS services I show will rely on you having a “privatekey.pem” and “cert.pem” file. You can generate these with openssl using the commands below:
You will be prompted to enter information to populate the fields of your self-signed SSL certificate. I stuff those with spam for proof of concepts. If I was engaged in a phishing exercise then a legit SSL certificate is the right move.
Simple HTTPS Server (Python 2)
I really liked “twisted” because it can do a *lot* of things. First you will need to install that using python’s pip package manager as shown:
pip install twisted
You can then start an HTTPS service using the command below:
twistd web --https=<port> --path=. -c </path/to/cert.pem> -k </path/to/privatekey.pem> #Syntax
twistd web --https=8443 --path=. -c cert.pem -k privatekey.pem                         #Example
Twisted automatically creates a logfile called “twisted.log” in the current directory it does not want to echo to stdout so you need to use:
tail -f twisted.log
The “-f” means read this file when it changes. The following shows what this means:
The content of the output includes User-Agents and more debugging related to SSL but is otherwise similar to “SimpleHTTPServer”.
Simple HTTPS Server (Python 3)
Python 3 is the future!!! Python 3 is the future!!! Python 3 is the future!!!
Again there are minor differences between python 2 and 3. This time you have to use “pip3” to install Twisted:
pip3 install twisted
If you already have “twisted” installed for python 2 this can get a bit confusing. Running the above seems to clobber the version in the path. When you run “which twistd” you will be pointed at the python3 version. Don’t trust me? Check the first line of that file:
Great. So is the syntax to run the server different? Fortunately not in my test the following worked just fine once more:
twistd web --https=<port> --path=. -c </path/to/cert.pem> -k </path/to/privatekey.pem> #Syntax
twistd web --https=8443 --path=. -c cert.pem -k privatekey.pem                         #Example
Hope that saves you some time when you want a simple HTTPS server!
We all love nmap right? Once you get through that learning spike at the start that is. Once you are happily battering out “-sS -sV -A -Pn ..” you feel like you have made it as a hacker. Not quite there yet? Practice kiddo.
A tool for nearly every challenge.
Finder of ports. Enumerator of versions. Confirmer of many vulnerabilities. Friend. Ally. For some of the hackers afraid of human contact I might even guess at… “lover”? But that is idle speculation.
The tl; dr version of this blog post is simply that there is a github repository here:
Clone it and play with the python scripts if that is what you want to do. Thanks for coming!
Some of you are reading on? Ok then. I will mention both of the scripts and why they exist.
Create Some Nmap Results
Before proceeding I need to have some results to play with. Lets port scan google.com because they are the heroes we need and can take it.
Here is the command that was run:
nmap -sS -sV -Pn -oA nmap-google.com -v www.google.com
Nmap scan report for www.google.com (216.58.201.4)
Host is up (0.0080s latency).
Other addresses for www.google.com (not scanned): 2a00:1450:4009:805::2004
rDNS record for 216.58.201.4: lhr35s03-in-f4.1e100.net
Not shown: 998 filtered ports
PORT STATE SERVICE VERSION80/tcp open http443/tcp open ssl/https
2 services unrecognized despite returning data.
I beg the courts indulgence to explain the flags:
-sS – A TCP SYN Scan. A privileged command so you need to have root privileges.
-sV – Conduct a version scan. When nmap knows your service the “service” and “version” and”extra” parts of the output and XML files are populated with juicy details.
-oA – Output to all three common nmap formats.
“.nmap” – as shown in the above example.
“.xml” – an XML file that nmap-summariser and nmap-grepper use.
The core bit here is that you must export the XML file format to use the tools I am talking about later. The optional part is using “-sV” to get more information to play with.
Nmap-Summariser
I made this to meet a need I had when writing a report. You pass it an nmap “.xml” file and it will spit out the data. Primarily I published this code so that someone had a simple baseline Python script that they could manipulate the output of easily to match whatever they needed. Funnily enough, nmap-grepper exists because it turned out I needed it!
This is not really meant to be used by people, but it had the hooks in the right places of the XML file so you could simply alter what you printed out to match your needs.
How does it work? Hackers are often curious so lets peek under the hood:
The for loop to look at
This is the key part of the script. The code above line 48 gets a reference to the XML file as an object and allows us to pick out specific XML nodes to get data from. To understand the for loop we need to know a little bit about the XML file format.
Here is a high level view of the XML structure:
<nmaprun>
 <scaninfo> Information related to how the scan was configured </scaninfo>
 <host> all data about host A </host>
 <host> all data about host B </host>
 <host> all data about host C </host>
 <runstats> Information about how long it took to run etc. </runstats>
</nmaprun>
The key part to note is that there is one or more “<host>” tags. Each IP address in your scan will be represented by a “<host>” tag. I have showed three to get the point across. Of-course our XML file from scanning google.com will have only one “<host>” tag.
Lets look at that for loop again. As I think of myself as a nice guy here it is below:
Hey, it is that for loop again!
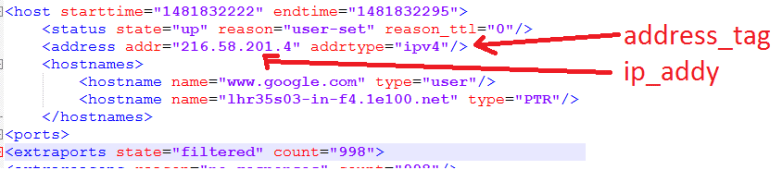
You can probably tell that this for loop is now essentially going through every “<host>” tag. Lines 49 and 50 are then getting access to a child node and then an attribute of that child node respectively. This is shown below:
Marrying the XML to the Python Code
I haven’t made my script amazingly robust. You might find errors at line 49 if it somehow does not have an entry at position [0]. It may also behave unexpectedly on an IPv6 network at line 50. Who knows?
For more information there is no substitute for opening your “nmap-google.com.xml” file in a text editor, and viewing the nmap-summariser.py script to see which tags/attributes it picks out:
For bonus points. Modify your script to display output in this format:
<IP>:<HOSTNAME>:<OPERATING_SYSTEM>
You will need to find a target, and re-run nmap with “-O” to force an operating system guess.
You will have to heavily modify the output lines to achieve this, and my script doesn’t even vaguely touch the OS tags so you have to find them in the XML. Happy hunting!
Nmap-Grepper
I went onsite and had a need to grep ports very quickly since there was a lot of data to sift through. So I modified “nmapsummariser.py” and ended up with “nmapgrepper.py”:
Why does this exist when nmap outputs a “.gnmap” which is greppable? Well, because that isn’t very greppable! Is the answer. The “.gnmap” format uses one line per host which can include any number of services. It gets very messy to work with very quickly.
So what does “nmapgrepper.py” do ? It simply flips it so you get a port/service view instead of a host view. Like this:
Output of nmapgrepper.py
With one host that only has two services we do not have much to work with here. Imagine this blown up to an internal network which has thousands of internal services. You can use “grep” and “cut” very quickly to interact with this file format. Want to find all “http”services ?
Using grep to list only http services
A simple grep will give you all services that operate on plain-text HTTP.
Want to just store the IP addresses that have “http” ? Go for a cut mate, like this:
Using cut to display only the IP
There you go you can now slice and dice an nmap scan to focus on particular services quickly. May no FTP service permit anonymous logins without you knowing about it.
When tackling a massive network I try to take a service approach first because a few common flaws will “get you in” most times. If that isn’t working flipping your attention to individual hosts that have some interesting services you can enumerate will often yield results.
If you want another coding challenge here then why not make “nmapgrepper.py” spit out this format instead:
That means more opportunities for greppability. Find me all things running Microsoft Server 2008? Show me any host with “dev” or “test” in the hostname? These are things you will be able to answer if you do.
Note: you can achieve the same effect with metasploit if you have enabled the Postgres database. Your reading for that is 100% this URL:
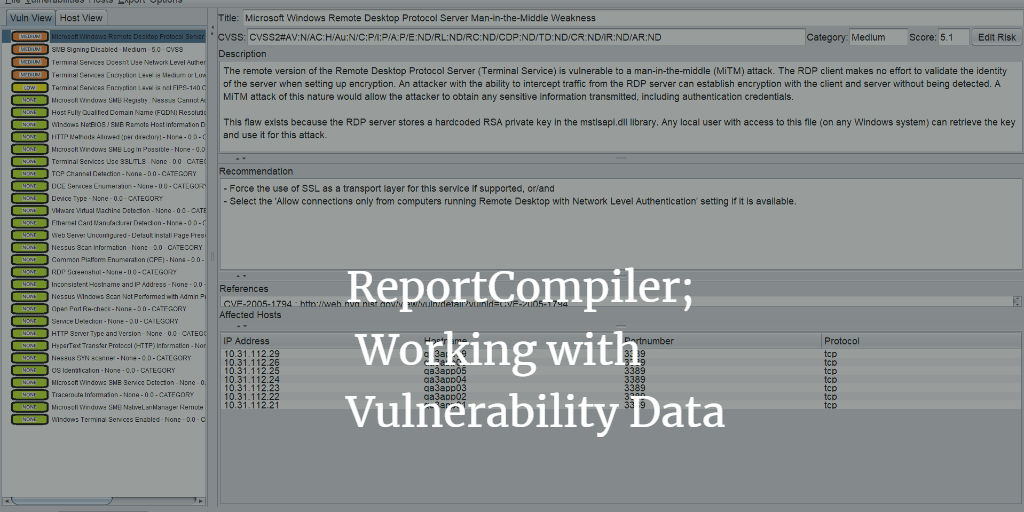
Report Compiler is a Java GUI allowing you to manipulate the output of various computer security scanner tools and save the results as XML. That is great if all you want to do is make an ordered list of vulnerabilities and set their ratings etc.
What it does not do is take that final step for you and make the a word document from the resulting tree. It does this on purpose since that becomes a commercial advantage that I should not give anyone, and also because you need to take ownership of your own companies reporting template not me! If I gave you a way to make word docs it would simply become a bun fight as to what to include and where.
This post will cover techniques you can use to integrate with your own word template by presenting a complete end-to-end process.
So you WANT to import an XML file into a word document and have it do pretty things? You have three options:
Option
Pros
Cons
Create a Word application level add-in
1. Always available when word is open.
2. Maximum level of control.
3. Allows you to use “modern” approach via Visual Studio.
4. Shipped docx files do not have any macros (no security warnings to recipients).
1. Visual Studio costs money to get the project template.
Create a Word template with embedded macros
1. You can use the VB editor built into word (ALT+F11).
2. Decent level of control over word objects.
1. Debugging a macro is a PAIN in the arse.
2. Can trigger security alerts when emailing resulting files.
3. The VBA coding interface is not modern compared to Visual Studio.
Create a script to convert XML to docx
1. Doing it all in code means learning nothing about word!
2. It is usually quicker to make a PoC.
1. I have used various libraries to do this in various languages. You do not have full control of Word objects with any of them.
2. The learning curve is steep as the APIs are usually not well explained. For simple tasks this is usually sufficient though.
The keen ones amongst you will note that option 2 (embedded macro) is the only one that everyone has access to. So this post will focus on that.
This post will describe the techniques that can be used to integrate ReportCompiler’s XML with a word document. It covers the following:
Creating a report template – So we are on the same page lets make a blank document and show all I am doing step by step.
Creating a building block for your vulnerability – design a reusable section you want to rely on again and again to deliver the start point for your vulnerability write ups.
Add bookmarks – these are place holders that should be inserted for instance where the title of the vulnerability should be placed within your blank vulnerability.
Save that as a building block
How to manually re-use that building block again.
Modify Word GUI to add options – A tangent away from importing ReportCompiler but very useful.
Add a macro to import ReportCompiler XML file – After all of the above finally getting down to showing the Macro code capable of importing XML and dropping it within your blank vulnerability.
By the end of this you will be capable of leveraging ReportCompiler to aid your reporting in your day job. There should be no mysteries left and you can use it to bodge pretty much any reporting process which ultimately lands as a word document before delivery.
The final template that was produced by this tutorial is available on github at:
If you are familiar with all of the word concepts and just want to see the thing in operation then skip to the end my friend.
Create a report template
A template is NOT a docx it is a dotx or in this case a dotm file since we are going to save a macro in it. If you are using a docx then you are not getting the full benefits of templating using word.
When you double click on a template file (dotx or dotm) it will launch a new instance of the file called “Document 1” which is entirely separate. This means edits in your new report are not directly editing your source template. Ensure your template has no client data in it and profit from never worrying about cross contamination from old reports again!
Create a building block for your vulnerability
I covered the concept of building blocks in Word Tips. The high level idea is that if you want to re-use a section you should probably create a building block. In this case our Macro is going to want a predefined building block to drop and then populate with our data from ReportCompiler.
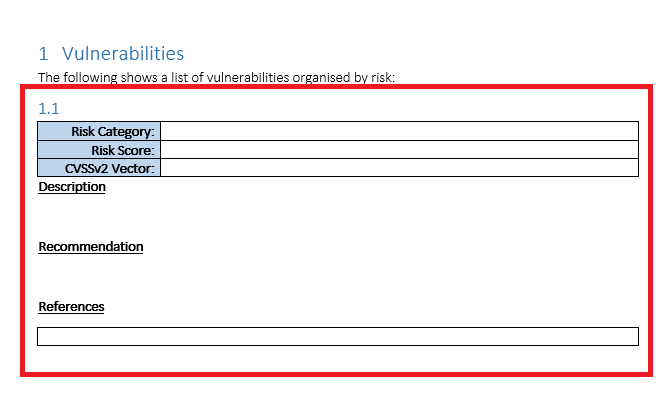
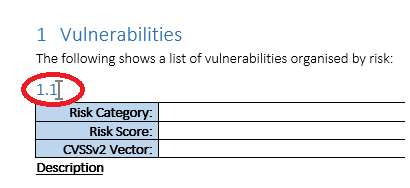
The following shows part of the template where I created a basic structure that all our vulnerabilities can go into:
Blank Vulnerability without Bookmarks
The part highlighted in red demonstrates the area which will become our building block. The line starting 1.1 is a Heading 2 style paragraph which will be where the vulnerability title will appear. This is a good choice since your vulnerabilities will appear in the table of contents and you can cross-reference to this specific heading.
Add bookmarks
The previous screenshot shows the building block without any “bookmarks” set. Here I will show how to add one and then show the final product.
To insert a bookmark follow the steps below:
Place the mouse cursor at the desired location.
In this case click after 1.1 where the vulnerability title should go.
Click on the “insert” tab on the ribbon and then look for the “links” section to find the “Bookmark” option.
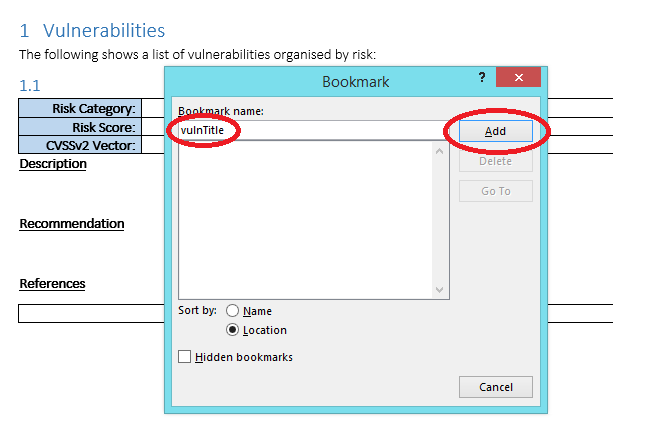
This will load a popup. Give the bookmark a useful name and then click on “add” as shown below:
Adding vulnTitle bookmark
After you have clicked on “add” you should see a new bookmark next to the 1.1 as shown below:
Bookmark Added Successfully
If you do not see that vertical grey bar then the bookmark has either not been added or your view in word is setup to hide formatting.
If you click “insert” -> “Bookmark” your bookmark should be visible in the list also.
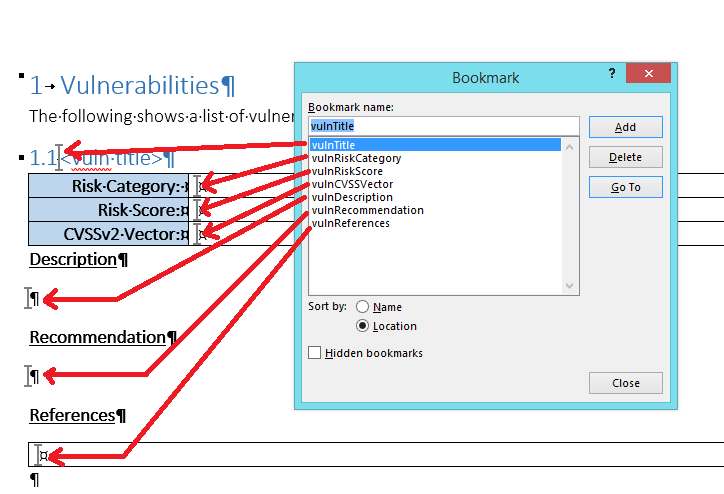
Now that you know how to add one bookmark here I go skipping to the end to show where the additional ones go into our building block:
You probably want to take note of the exact bookmark names as case is important when it comes to the Macro interacting with these.
Note; I took the screenshot at a point where the vuln title was not blank. I could not be bothered redoing the red lines. Sue me.
It is also possible to use placeholder text and then simply search and replace that to obtain the same results. However, when it comes to performance that worked out way slower and way more prone to errors. Hence I now use Bookmarks like I was probably always supposed to.
Save as building block
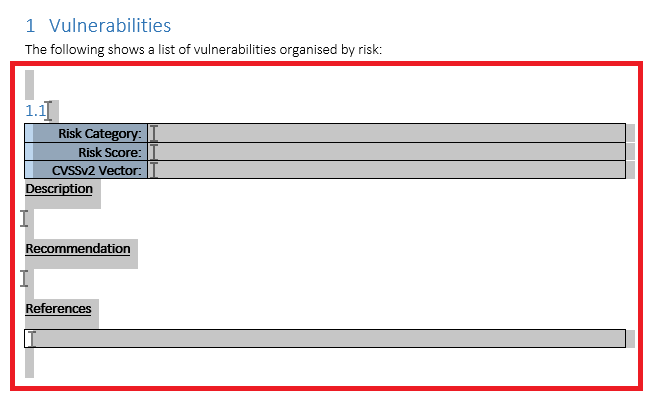
Now that we have a blank vulnerability section marked up with Bookmarks we should go ahead and save that as a building block. To do that select all of the content that you want to save as shown:
Selecting area to save as Building Block
At this point you want to follow the steps below:
Click on the “insert” tab on the ribbon.
Click on the area labelled “Quick Parts” on the text group (towards the right of the screen).
Click on “Save selection to quick part gallery”
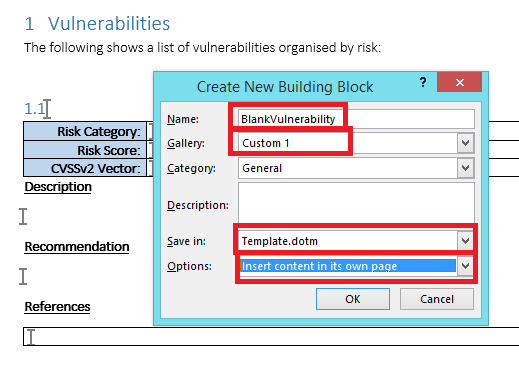
Then configure the building block as shown below:
Saving new Building Block
A couple of things are worth highlighting here:
Name – Select a useful name and note it down. Your macro will need to know the exact case sensitive version of this.
Gallery – Select a custom gallery, others are available but if you use Custom 1 then you can add a control easily to word to show ONLY building blocks in that gallery. This is shown later under heading “Modify Word GUI to add options” below if you cannot wait.
Save In – If you want the building blocks to be shipped with your template then the name of your dotm should appear here. If you were to change the drop down to “normal.dotm” or the other options, then you will find that building blocks are stuck on your “developer” computer. By selecting the template file itself you are ensuring they are shipped to other users which is almost always what you will want.
Options – I have selected “Insert Content on its own page”. You can alter that if you want vulnerabilities to appear one immediately after the other. Sometimes people want one vulnerability per page etc. Choice is yours.
Click on “ok” and you will find that the building block has been saved to Custom Gallery 1.
Now that you have saved this as a building block you can go ahead and straight up delete the highlighted blank vulnerability. Your report template probably wants to start with zero vulnerabilities since you haven’t found any yet.
Save the template file at this point.
How to insert our blank vulnerability when making a report?
This section is optional if you know how to use building blocks. Skip straight down to the macro if you already know this.
In the previous section we finally saved our blank vulnerability as a building block. We can use the laborious “insert” -> “quick parts” -> “building blocks organiser” -> find Custom 1 gallery entry, select the block we want and then “insert” process to manually add back in our building block. But that is a lot of effort to do every time.
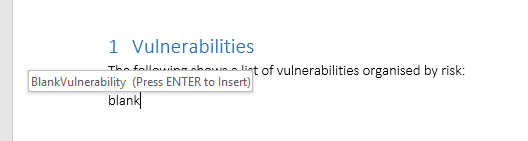
Word has a few options to make inserting your blank vulnerability easier. One is simply start typing the name of the building block. In this case we called it “BlankVulnerability”.
The following shows what happens if you try and type “blank”:
Auto Prediction Mother Hubbards!
You can press Enter to insert the building block. Amazeballs yea?
However, what if you grow your building blocks repository massively are you going to remember all of the names? In which case look in the next section to GUI yourself happy.
Modify Word GUI to add options
This section is optional if you know how to use building blocks. Skip straight down to the macro if you already know this.
It is possible to modify the Word GUI to add a custom tab to allow us to put pretty much any control we want where we want it. The process is a bit convoluted so most people get scared and never bother.
Follow the steps listed below to do this:
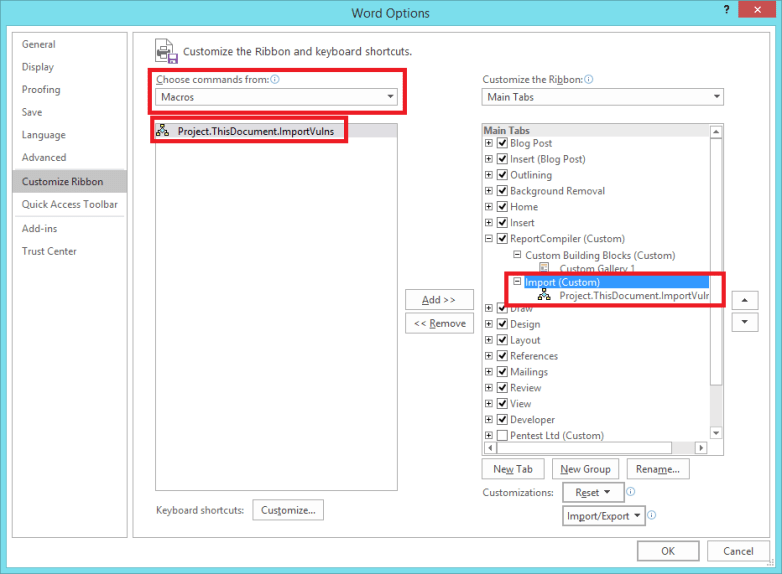
Access the word options by going to “File” -> and then “Options”.
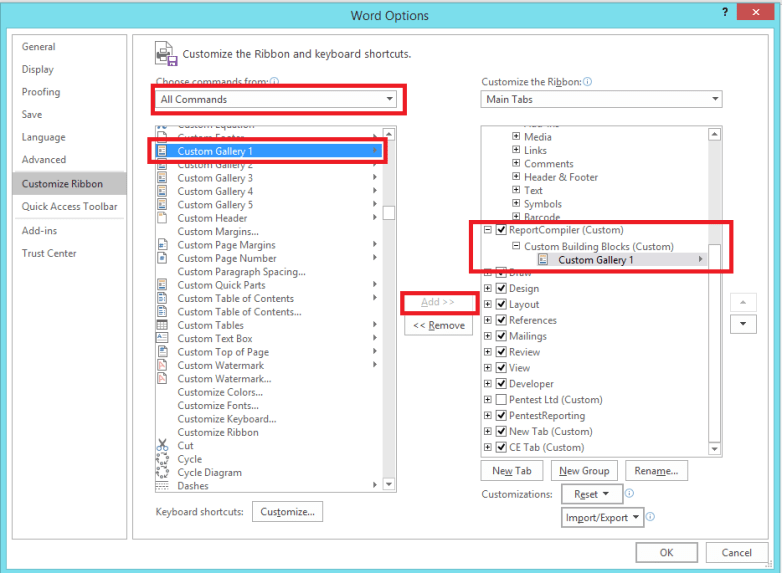
Click on “Customize Ribbon” on the left hand side.
Where it says “Choose commands from” select the drop down and set it to “All Commands”
In the massive list of all commands find the “Custom Gallery 1” control (this has to match exactly the Gallery you saved your building block into.
On the right hand side you need to create a new tab. Click on “New Tab”, you can right click on the newly created tab and give is a name. I called mine “ReportCompiler”.
You should then select the “ReportCompiler” tab and then click on “New Group”. Again right click on the newly made group and rename this to something meaningful. I used “Custom Building Blocks” as the name.
On the right hand side you should have your custom group selected and on the left hand side “Custom Gallery 1” should be selected. Now click on “Add >>” in the middle and watch in awe as it adds that to your custom group.
The following screenshot shows how this should look at the end of the process:
Fear the customize ribbon options no-more
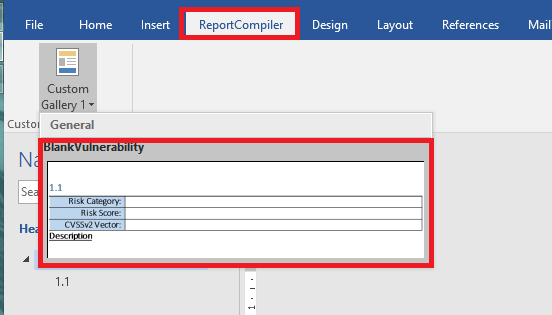
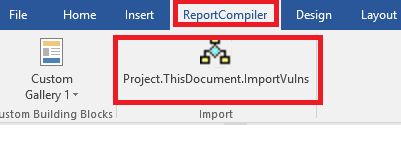
If all is well you should have a brand new tab on your ribbon called “ReportCompiler”. Why on earth did I bother making you do that? Well looky at your new tab here:
Enjoy Endless Building Block Success
It shows you a preview of the building block, it shows the name of the building block, it only shows your building blocks, and if you click on one it will drop it instantly into the word document.
This saves me a lot of time. However, this has nothing to do with the Macro importing of ReportCompiler which we are getting onto in the next section.
Add a macro to import ReportCompiler XML file
Now you have; a blank vulnerability section marked up with bookmarks, saved in Custom Gallery 1. You are good to go and fire into the world of VBA within word.
I have to admit that the development environment for VBA is pretty poor and you will have a real nightmare debugging things at first. It really feels legacy but we are just about able to coax what we want out of it. If you want all of the modern conveniences your best best is to write an application level word add-in which requires a paid for version of Visual Studio to get the project template.
You should have a word document roughly similar to mine at this point. Press “ALT”+F11 to launch the VBA Editor.
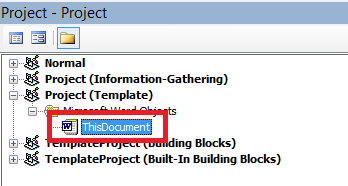
My file is called “Template.dotm” we want to make sure our VBA code is in the right project. The following screenshot shows how to locate the correct one:
Select “ThisDocument” for Project (<filename>)
Find the project called “Project (<filename>)” then expand and select “ThisDocument”.
This means that we are finally embedding a Macro into this template file.
When the user double clicks on “Template.dotm” they will get a new file called “Document 1.docm” which will also contain any VBA specified in “ThisDocument”. Got it? Good.
The following shows the full listing for the Macro code that I am giving you to get started with. If you copy it all and paste it into that massive empty text box on the right you will have just created the same template.dotm that I have added to github:
”’
‘Copyright 2016 Cornerpirate
‘
‘Licensed under the Apache License, Version 2.0 (the “License”);
‘you may not use this file except in compliance with the License.
‘You may obtain a copy of the License at
‘
‘ http://www.apache.org/licenses/LICENSE-2.0
‘
‘Unless required by applicable law or agreed to in writing, software
‘distributed under the License is distributed on an “AS IS” BASIS,
‘WITHOUT WARRANTIES OR CONDITIONS OF ANY KIND, either express or implied.
‘See the License for the specific language governing permissions and
‘limitations under the License.
”’
”’
‘ 1) Prompt user for location of report compiler file.
‘ 2) Parse file and get access to all “vuln” tags.
‘ 3) Loop through each vuln and add into word document at current selection location.
‘ There is no error handling, and this is NOT handling how you get the affected hosts,
‘ Or handling the reference URLs. If it a demo of how to read the XML file and shows
‘ how to access XML attributes, and decode the base64 text fields. You can take it
‘ from here right?
Sub ImportVulns()
Debug.Print “== ImportVulns”
‘ 1) Prompt user for file
filepath = promptForInputFile()
Debug.Print “User Selected:” + filepath
‘ 2) Parse XML
Dim objXML As MSXML2.DOMDocument60
Set objXML = New MSXML2.DOMDocument60
If Not objXML.Load(filepath) Then
Err.Raise objXML.parseError.ErrorCode, , objXML.parseError.reason
End If
Dim xmlNodes As MSXML2.IXMLDOMNodeList
Dim xmlNode As MSXML2.IXMLDOMNode
‘
Set xmlNodes = objXML.getElementsByTagName(“vuln”)
‘ Before inserting anything park the undo record tracker
‘ This should mean one undo will remove all vulns added.
Dim objUndo As UndoRecord
Set objUndo = Application.UndoRecord
objUndo.StartCustomRecord (“Insert Vuln Action”)
‘ Loop through each vuln tag.
For Each xmlNode In xmlNodes
Dim title, description, riskcategory, riskscore, cvssvector, recommendation As String
Dim customRisk As Boolean
‘ get properties from attributes
riskcategory = xmlNode.Attributes.getNamedItem(“category”).text
customRisk = StrComp(xmlNode.Attributes.getNamedItem(“custom-risk”).text, “true”)
‘ A “custom Risk” is something using “high”, “medium”, or “low” style risk scoring.
‘ A “CVSS” vuln is one using CVSS.
If (customRisk) Then
cvssvector = xmlNode.Attributes.getNamedItem(“cvss”).text
‘ Here I am substringing to get only the base vector.
‘ This is a demo only, and you might want the full vector.
cvssvector = Mid(cvssvector, 7, 26)
Else
‘ This is a custom risk, we do not have a CVSS vector
cvssvector = “n/a”
End If
‘ get simple data from child nodes.
title = DecodeBase64(GetDataFromNodesChildren(xmlNode, “title”))
description = DecodeBase64(GetDataFromNodesChildren(xmlNode, “description”))
description = Replace(description, vbNewLine, “BB”)
recommendation = DecodeBase64(GetDataFromNodesChildren(xmlNode, “description”))
Debug.Print title
‘ At this point we need to get the building block
‘ Called “BlankVulnerability” which will be in the templates building blocks.
Dim oTemplate As template
Dim oBuildingBlock As BuildingBlock
Dim theBuildingBlock As BuildingBlock
Dim i As Integer
Set oTemplate = activeDocument.AttachedTemplate
For i = 1 To oTemplate.BuildingBlockEntries.count
Set oBuildingBlock = oTemplate.BuildingBlockEntries.Item(i)
If oBuildingBlock.name = “BlankVulnerability” Then
Set theBuildingBlock = oBuildingBlock
End If
Next
‘ Add this vulnerability at the current selection range.
‘ This means “where the cursor is”
Set newRange = theBuildingBlock.Insert(Selection.range)
‘ After insertion update all of the details using the bookmarks for the locations
newRange.Bookmarks(“vulnTitle”).range.text = title
newRange.Bookmarks(“vulnDescription”).range.text = description
newRange.Bookmarks(“vulnRecommendation”).range.text = recommendation
newRange.Bookmarks(“vulnRiskCategory”).range.text = riskcategory
newRange.Bookmarks(“vulnRiskScore”).range.text = riskscore
newRange.Bookmarks(“vulnCVSSVector”).range.text = cvssvector
Next
‘End the custom undo record
objUndo.EndCustomRecord
End Sub
”’
‘ Display popup looking for Report Compiler XML file
‘ Returns file path.
Function promptForInputFile() As String
Dim fd As Office.FileDialog
Set fd = Application.FileDialog(msoFileDialogFilePicker)
fd.AllowMultiSelect = False
fd.title = “Please select the file.”
fd.Filters.Clear
fd.Filters.Add “Extensible Markup Language Files”, “*.xml”
fd.Show
promptForInputFile = fd.SelectedItems(1)
End Function
”’
‘ Drill through the child nodes and return text of the named node.
‘
Function GetDataFromNodesChildren(xmlNode As MSXML2.IXMLDOMNode, name As String) As String
Dim answer As String
Dim childNodes As MSXML2.IXMLDOMNodeList
Set childNodes = xmlNode.childNodes
Dim childNode As MSXML2.IXMLDOMNode
For Each childNode In childNodes
If StrComp(childNode.nodeName, name) = 0 Then
‘ found the target node
answer = childNode.text
End If
Next
Set objXML = New MSXML2.DOMDocument60
Set objNode = objXML.createElement(“b64”)
objNode.dataType = “bin.base64”
objNode.text = strData
DecodeBase64 = StrConv(objNode.nodeTypedValue, vbUnicode)
Set objNode = Nothing
Set objXML = Nothing
End Function
This has comments to explain the big things and it will read better in the VBA editor than on this page for sure.
Use CTRL+S to save the macro into your document.
At this point you can run the “ImportVulns” function by placing your cursor inside it and pressing F5. Or you can get fancy and bind the macro to a button on our ReportCompiler tab (if you followed the previous section you should roughly know how already).
The following screenshot shows how that should appear once done:
Adding “ImportVulns” Macro to ReportCompiler Tab
The difference this time is that you should select “Macros” for the “Choose Commands From” setting. I also created a new group and called it “import” and then placed the macro under that group.
If you have done the customisation correctly you should see the following options on your “ReportCompiler” tab:
Added Import Vulns Action
If you click on this button it will do as the VBA comments say:
1) Prompt user for location of report compiler file.
2) Parse file and get access to all “vuln” tags.
3) Loop through each vuln and add into word document at current selection location.
Error; User-defined type not defined
If you are running the “ImportVulns” function and it produces this error. The chances are that you need to map XML as a resource. To fix this follow these steps:
select the relevant “ThisDocument” again from the projects on the top left side. (this was shown previously)
Click on “tools” menu along the top and select “References”.
Scroll down the list until you find “Microsoft XML, v6.0” and check that.
The following screenshot demonstrates the above process:
I am an odd penetration tester. I actually *enjoy* making reports. I like explaining things to customers and making anything with my name on it as useful as possible. I shoot for the most detailed and tailored recommendations that I can muster. I am also big on making the smallest list of vulnerabilities possible. If two things are solved by one recommendation? Then it 100% must be one thing. I aim to get to the root cause to reduce the burden on customers when reacting to my reports.
To get toward my goal I have made a raft of tools to help me gather evidence, collate and interact with it, and ultimately kick into a report. The sooner it gets into Word the sooner I can go nuts with formatting everything appropriately.
With this I have solved a lot of the hassle for people wanting to interact with the output from Vulnerability scanners.
ReportCompiler is useful for people who simply get handed the output from various scanners (say those engaged in VA cycles) and who want to make a spreadsheet. Through those who want a better Nessus viewer (and be honest the web interface pisses you off!), to those who want to actually automate their reporting and who are willing to do some work for it.
The GUI is, I am told, reasonably intuitive. If in doubt right-click on shit and eventually you might find what you were looking for. You get a different context menu on the vulnerability tree, and the affected hosts list in particular and its worth seeing those options.
Caveat; This is bleeding edge. It has no undo/redo for actions on the vulnerability tree, or affected hosts list, it does not autosave. Trusting it to do these things will ruin your day.
Caveat 2; While you can edit text there is no spell check and there is no support for advanced formatting. I would only use this to make a list of vulnerabilities with a risk rating, a generic description, and provide references. Word is a far superior editor so be aware of the limitations.
Caveat 3; I know the features it is missing. I have a road map, but that map has no timescales!
What does it Import
Currently it includes the following importers:
Nessus (.nessus files only using v2.0 of their XML)
SureCheck (.xml file only)
Burp Scanner (you probably have never found the export option for how though, this is not the file -> save. You right click on the issues save the XML and select Base64 encode request/response).
It has a reasonably flexible architecture for importing which means if I have a need to import something I basically implement it pretty quickly. In the past I have written parsers for many more security tools but this is what I have in the open source realm. A decent start.
What does it Output?
It outputs to either of the formats listed below:
ReportCompiler XML – the “file -> save as” option will drop a save file so you can keep your current details for later.
Note: you should use CTRL + S to save files as you go because this is not going to autosave a damn thing for you.
I periodically save as to create a new file to not put all my eggs in one basket.
It is not made as a text editor for vulnerabilities so I just tend to sort out risk scores and line things up for proper editing in word.
Excel XLS – the “export -> xls” option will drop a spreadsheet that can be used to debrief clients pretty well. Devoid of any additional content you will look like a total amateur if you attempt to sell that as a report.
It purposefully doesn’t make word documents. That would be a commercial advantage and I literally will never make this open source version make your reports for you. Sorry bro, you will have to manipulate the XML file into whatever template you have.
I will make a tutorial on how to do that, but it will take a bit of time to assemble.
You are free to fork the source code repository and make it do whatever you want. All that I ask is that importing routines for standard tools are fed back to the main open source repo by a pull request.
Brief Overview of what it does
The killer (but not exhaustive) features are basically the following:
Merge – Select more than one vulnerability and right click to merge. You will understand what this does and eventually it will solve most of your problems. From reducing multiple overlapping issues into one but keeping the affected hosts accurate, to simply conflating two issues and keeping the affected hosts from both but the text write up from another. This is the goto feature for lots of stuff.
Personal Vulnerabilities – Write your own versions of vulnerabilities and then save them for later. You can marry up one personal vuln to many issues from vulnerability scanners and then have them “auto merge”, or you could add yours to your tree and manually merge. The result would be you converting multiple cruft vulns into one well worded and ready to fire issue.
Classic example would be writing one “Insecure SSL Certificate” finding which is mapped to the 5 or so Nessus plugins. Great I get it that the certificate is invalid, but since the solution is “buy a valid cert”, I really don’t need to tell my customer 5 times do I?
Output to XML – A pretty simple XML format is used as the save file. Once you are done with manipulating your list of vulns you can save it for later. If you do a bit of legwork you can integrate this XML file into your reporting format for production.
Grep for vulns – There is a tree filter to which you can supply Java regular expressions to group vulns together. This is very good when it comes to finding issues you might want to delete entirely or merge together.
There are many more features in there. Some are bleeding edge and the joy is not telling you where those mines are. If I haven’t listed it above? Chances are it’s fun but probably a use at your own risk kind of thing.
Over this summer I have delivered a speech entitled in my head “how to Word” a number of times. It covers some stuff which helps get you from someone who wrote a CV in Word once to someone who is more able to spit out 100 page documents in 5 days.
Likely to be a thing I add to over time. The blog post is really to shamelessly link people to the pinned page:
When I am interviewing people for a job I use the line about how “Pentesting is 50% technical and 50% consulting”. Not much point in being able to do technical gymnastics if you cannot document it, explain things right, or deliver those notes on time to customers.
I was given instructions to start an office. Find candidates, filter through them, and then pick a number of them. A lot of trust and I wholeheartedly thank my employers for giving me the rope to do this.
I have never really seen becoming a manager as a career ambition. I always have, and most likely always will, call this “failing upwards”. Why? Put simply being a Pentester for me is the greatest job on the planet. Any step away from doing that *every*day* must simply be called “failing” right?
Over the years I have assisted many in the industry by offering; advice, training, but most importantly (so I am told) is TIME.
During my decade or so I have seen those I helped go from entirely green to campaign hardened professionals. Thinking back to them being straight out of university and unable to sort out their “multiple simultaneous logins” from their “session hijacking” (more common than you might expect that confusion!). They now are doing exceptional things themselves.
Usually the committed people will get there on their own and it is not necessarily my influence. In some small way I hope they do even one thing better as a result though!
Currently, I still get to do a decent number of testing days which is good. However, I see the time for that coming to an end relatively soon. The in-take for the inaugural year seems set and now we just have to focus on starting them off correctly.
Guess I will have to live vicariously by assisting my new troop during their projects. To support all of this I have been making training and coming up with little speeches in my head.
Today I am really excited to start the newest member of the team off on the route of how to be professional, and get the job done. There are a lot of myths about the industry that seem to build up. Universities seem adept at teaching some things but not in making “consultants”. Part of the programme will be to sort those out!
The goal is not to make people ready for passing some certification like CREST. It is to make them engaged with their job, confident in doing it, aware of where to get information, and to deliver things that are useful to customers.
Remember these few points:
the report is the “product”. Not how amazing your technical acrobatics is.
recommendations are what the customer pays for.
talk to the customer. Not all of them are the same, some might have a preferred risk system etc.
Take ownership of your deliverables, care about your name being on it, and TALK to the customer. These things will set you up the right way.
It is exceptionally difficult to keep various content management systems up-to-date against the number of security patches that are released. However, many sites are powered by software such as; WordPress or Drupal etc.
A good site admin (one following various “lockdown” guides) will undertake steps to remove version numbers being disclosed in HTTP response headers, or within returned content as per recommendations like those linked to below:
As security professionals we also tend to recommend such steps since it pro-actively helps you engage customers in securing their site. However, the majority of attacks against publicly known issues are conducted by blind brute-force. Real-world attackers simply do not bother to check for version information before they fire the exploit code at you. What is it to them if their illegal activity causes your site to crash or get defaced ?
It is just down right unprofessional to fire public exploits at a target and hope something sticks in the manner a real threat agent would. So, in choosing to “secure” your site, you may effectively only be masking problems that your rather expensive penetration testing provider would otherwise have located.
How to ensure that your customer is not vulnerable when they have undertaken steps to obscure full version information? This was the question I had to answer last week.
To illustrate the work flow understand the following steps:
You come across a target using Drupal
You observe version 7 in the HTTP response headers but are unable to obtain specific minor version information.
You turn to an established fingerprinting technology such as Blind Elephant and point it at your target:
BlindElephant.py https://TARGETSITE/ drupal
Loaded /usr/local/lib/python2.7/dist-packages/blindelephant/dbs/drupal.pkl with 145 versions, 478 differentiating paths, and 434 version groups.
Starting BlindElephant fingerprint for version of drupal at https://TARGETSITE/
Hit https://TARGETSITE/INSTALL.txt
File produced no match. Error: Failed to reach a server: Not Found
Error: All versions ruled out!
This has failed us because it did not find one of two files. The approach for BlindElephant is (I believe) reliant on maintaining a database of files to check for centrally. To me that sounds like a lot more work than I am willing to put into life!
Then I was thinking to myself; “But cornerpirate, the site is powered by code which is entirely available on github.com, can’t we use the features of git to give a really robust answer?”. A few hours later enter “git-version”:
You do offline reconnaissance against your newly download drupal 7 folder. This equates to “hunting for static content”:
Find a unique list of file extensions (inside the new ‘drupal’ directory: find . -type f | perl -ne ‘print $1 if m/\.([^.\/]+)$/’ | sort -u
Review the output above to find anything static. This will at least be; *.txt, *.html, *.js, *.inc, *.sql in the case of Drupal. There are potentially a few more in there.
Create a list of the file names for such static content: find . -name ‘*.inc’ > inc-files.txt
Repeat for all interesting file types.
You now have a list of files you want to check for on the target site.
From here you need to try and download every single one of those files from your target site.
When you find a file simply download it and then use git-version to check which revision that file is at. Ideally you want to base your version on something which has hundreds of revisions. In the case of Drupal those *.inc files appear to be good candidates.
In my case the site allowed access to “bootstrap.inc” which I then passed as input into git-version:
Here we have a ‘mildly’ outdated site. The most recent version is 1/637 where 637 is the total number of revisions. As we are using 9/637 there are 8 newer revisions.
If you visit the URL provided it will take you to the raw version where you can typically learn things from the commit message:
Drupal 7.41 as determined using git-version
Great success! That version of the file is literally md5 checksum identical to the version in release 7.41 of Drupal.
Also note, as it happens, that the ‘bootstrap.inc’ file happens to helpfully announce the version anyway. So in the case of drupal 7, we could replace the entire ‘git-version’ tool workflow with: